"KNOWLEDGE-BASED FITNESS"
Showing posts with label posture. Show all posts

Sunday, July 12, 2015

When Verbal Cues Are Not Enough, Continued...

              When Verbal Cues Are Not Enough....Continued

In the previous post, we discussed how providing verbal cues some times does not get our clients or patients to perform therapeutic activities using proper technique.  Therefore, we must use other, more physical cues in order to reach our goals.  Another common every day functional movement that we perform is the Lunge.  Upon initially asking a client to perform a lunge, we may see this....


In the second and third images, you can see a forward head posture and rounded upper back (protracted scapula), as well as a slightly rounded lower back.  I can choose to verbally overwhelm the client as she moves from static stance into her lunge position by asking her...(read more)


Tuesday, July 22, 2014

Postural Habits

Forming New Postural Habits
 
 
As a Home Care Physical Therapist, I see how my patients spend a great deal of their time during the day.  Some try to be very active, while others try to do as little as possible.  Upon arriving at their home, I observe their postural habits quickly.  Some of them don't seem to move between visits.  They may be slumped to one side in their recliner.  Upon standing up to walk, they take on the same posture, slumped to one side.  This slouching posture creates muscle tightness, which may later affect lung expansion and the ability to take deep breaths.  I explain to them that if they are not motivated to perform an entire exercise routine, then they should just focus on one thing, maintaining proper sitting posture.  This would improve their walking and standing tolerance.  Considering the fact that they spend the majority of their day sitting in their chair, sitting with correct posture is not much to remember, but it is more difficult than you think. 
 
 
Some want to just place pillows at their sides to stop them from collapsing in the chair.  However, this does not allow them to strengthen their trunk.  It only passively positions them.  Pillow propping is useful with patients who have such weakness in their trunk that they can not safely maintain the seated position.  It also helps prevent the development of sores.  However, I am not talking about patients who have these deficits.  I am focusing on patients who do have the strength to make postural corrections, but choose not to because it is "too difficult" for them.

 
Quick Tip:
 
I frequently recommend to family members or caregivers that if the patient is not compliant with the requests to correct their seated posture, then they can do little things throughout the daily routine, such as relocating the silverware or their glass of water to the side that the patient is slouching away from.  They can do the same thing with the remote to the TV.  This would force the patient to actively move their trunk in the position that they are frequently avoiding.  You just have to remain persistent about placing the remote or the dinner utensils to the "avoidance" side.  If this becomes consistent, you would be amazed at how many times your patient will correct their posture in order to reach for their cup of water.  This repetitive activity will be part of their exercise program. 


Sunday, April 13, 2014

Benefits Of The Single Leg Deadlift

Benefits Of The Single Leg Deadlift
 
When performing the Single Leg Deadlift, in order to maximize the benefits you must perform the technique with proper form, especially upon fatigue.  I have used this exercise to train ankle and knee stability, hip stability and strength, balance, trunk rotational stability, grip and scapula control (to name a few). 
To begin the technique, place the kettlebell on the inside of the stance leg so that as you flex forward you can reach the handle with the opposite side's arm

While lowering your trunk down towards the kettlebell, you do not want to allow your trunk to rotate.  Keep your shoulders and hips 'square' with the floor.  The image directly above is incorrect, while the image below is correct

You want to maintain a straight line from your shoulder to your hip, knee and ankle.  This will help you with the hip hinge technique which protects your lower back

Lower your trunk while maintaining scapula retraction.  Keep your ears in line with your shoulders.  You lower your trunk until your hand reaches the kettlebell handle. 

 
Do Not allow your scapulae to protract or your trunk to rotate towards the kettlebell in order to "lengthen your arm" for you to more easily reach the handle.  You will need to work hard at this especially upon fatigue


Grip the handle, contract your glutes and scap retractors and return to stance
 
Finish the repetition in tall standing with glutes squeezed. Do not rush into the next repetition by not locking out in tall standing first

Monday, December 2, 2013

Body Awareness

Body Awareness
 
Most people who are suffering from low back, knee, neck or other common conditions can greatly reduce their symptoms by simply correcting their posture, body mechanics, lifting techniques, etc..  However, this is not so simple.  Many people do not have the body awareness needed to perform correction techniques merely upon verbal cues by their trainer or therapist.  When I am faced with this client, I will allow them to rely on a mirror for feedback as well as providing them with manual cues.  Nowadays, everyone has a cell phone with camera capabilities.  I have taken pictures during a session and either emailed 'before' and 'after' photos to my clients for further education or I print out the photos to use during their sessions for visual feedback.  After educating my clients using these tools (mirror, photos, manual cues), I assess the carryover by removing those tools.  Once they are able to correctly perform the task at hand, I remove the external cues so that they further develop body awareness.  My goal is to ensure independence with body awareness.  After all, your client will not always have a camera, a trainer/therapist or a mirror available when performing daily activities.     

Monday, November 18, 2013

Protect Your Back Even With Light Lifts

Protect Your Back Even With Light Lifts
 
 
Over ten years ago, due to heavy lifting with incorrect technique, I was unlucky enough to develop a herniated disc in my lower back.  This was the worst pain I ever experienced.  Thanks to Physical Therapy school, I was able to manage it conservatively.  However, every now and then it would "go out on me," causing severe pain with even the slightest movement.  One day, after being pain free for a few months, I told a family member I would help them move.  We had to lift and carry a 55-inch rear projection TV (the bulky kind, not the nice flat screens we have today).  I did my part without a problem.  Upon finishing up that day, I bent over to pick up a pencil from the living room floor, and fell to my knees in agony.  After everything I lifted and carried that day, a simple number 2 pencil drops me to my knees?  While on the floor, I had plenty of time to think about what had  just happened.  Why did my back tolerate heavy lifting all day long, but when I lifted something as light as a pencil, my back went out on me?  I realized that with every heavy lift, I did not just carelessly walk up to the item and lift it.  Instead, I prepared my back by co-contracting the spinal stabilizers prior to each lift and carry.  That's when I realized that it doesn't matter how heavy the object you are lifting is.  If you bend over to pick up an item, it is wise to perform the lift with proper body mechanics and pre-stress and stabilize your spine.  This will minimize your chances of injuring or re-injuring your spine. 

Thursday, November 14, 2013

"Your Hips Are Like Headlights On A Car"

"Your Hips Are Like Headlights On A Car"


When teaching a client about proper body mechanics and lifting techniques, a good visual cue is to tell them that their hips are like  headlights on a car. 


To safely drive at night, you must point the car's headlights in the direction that you want to go.  Functionally, to safely lift or reach, you must point your hip bones in the direction of the activity.  This spares the spine by minimizing lumbar rotation/twisting while bending/lifting.
 
Here, the hips are pointed to the right, while his bending/lifting activity is to his left
 
As she turns to the right, she pivots on her feet and moves as a 'whole,' squaring-off her hips in the direction of her action

Take home message: 
Always "square-off" your hips in the direction of your action.  Do not twist and lift from the left or right with your hips pointing in a different direction.
 
 For more on Posture & Body Mechanics, go to: Posture & Body Mechanics DVD for over 80 minutes of education videos


Wednesday, October 30, 2013

Golfer's Lift

Golfer's Lift
 
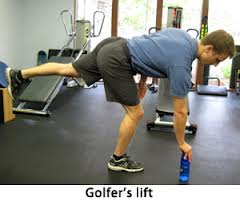
The golfer's lift is a helpful technique that you can use to lift lighter objects from the floor while sparing your spine. 
 
 
You can see there is a slight bend on the support leg knee, the lower back remains flat (not flexed), as a hip hinge technique is utilized rather than flexion of the spine.  There is also minimal rotation of the spine.  More helpful techniques are explained in the S.O.D. Posture & Body Mechanics DVD - Posture & Body Mechanics DVD

Monday, October 28, 2013

Postural Braces

Postural Braces
 
Many, if not all of my clients require postural education and training.  Posture seems to play a major role in most therapy conditions, especially shoulder, neck and lower back pain.  For the most part, I find myself constantly reminding clients to tuck their chin and retract their shoulders.  This "nagging" leads my clients to the question, "Can't I just buy a brace to keep me in proper posture?"  The answer is "yes, you can."  Here are two pictures of postural braces.
 
 
This brace appears to retract the shoulders/scapula and probably provides a sense of lower back support (I said a "sense" of support, not actual support").  Since many of my clients have the rounded anterior shoulder positioning, the chest muscles become tight, and the rear shoulder/scapula muscles become stretched out and weak.  The brace shown above pulls the shoulders back, stretching the chest and shortening the rear shoulder muscles.  But what happens when you remove the brace? Will the rear shoulder muscles now be strong enough to maintain the scapula retracted position against the anterior pull of the chest?  Probably not.  In my opinion, these braces are "quick fixes" that do not fix the source of the problem.  It is a superficial correction.  My goal is to have my clients rely on their own body to maintain proper body alignment.  Postural muscles work isometrically.  The posterior shoulder muscles must maintain the proper shoulder position throughout the day.  In short, you must stretch the pecs, and strengthen the shoulder/scapula retractors (muscle endurance).  I would only consider using a postural brace on a patient who has had chronic postural deformities, as the brace will assist in statically stretching muscles that have shortened over time.  I would still always include active strengthening to the affected postural muscles.  For my younger patients, I say: "Don't be lazy! Do the work! Stretch what needs to be stretched and strengthen what needs to be strengthened!"  Just maintaining proper posture as often as you can throughout your day is an exercise in itself.   
 
For the S.O.D. DVD on Posture & Body Mechanics, go to Posture & Body Mechanics DVD for over 80 minutes of educational videos

Monday, October 21, 2013

Is My Patient Exagerating Their Pain Level?

Is My Patient Exagerating Their Pain Level?
 
 
Many times, when working with clients who have been experiencing lower back pain for a long time (months or even years), the slightest touch or smallest movement will send their pain level through the roof.  Initially, as therapists we may think this to be an exaggerated response, a patient with a low pain threshold, or a patient with other motives.  But can the patient's experienced pain level really be this intense upon light touch or gentle movement?  It is believed that when tissue damage in a body region exists, the nociceptors (nerve cell that responds to painful stimuli) are increasingly stimulated, which amplifies the sensitivity to that stimulus.  You do not get used to pain caused by tissue damage, but become more sensitive to it.  This may cause a doctor to prescribe higher intensity pain medications or refer their patient to the pain clinic.  However, if we take a step back and treat the source of the tissue damage, which many times may be poor body mechanics or posture, we may be able to spare the tissue damage.  Once the pain level decreases we can begin to incorporate more aggressive rehabilitation exercises.  For information on posture and body mechanics, go to Posture & Body Mechanics DVD           

Monday, October 7, 2013

Single Leg Stance Muscle Activation

Single Leg Stance Muscle Activation
 
Upon standing on one leg, in order to maintain upright proper posture, you must maintain a level pelvis by firing the Gluteus Medius and Minimus as well as the Quadratus Lumborum and Obliques.  The Gluteus Medius, Gluteus Minimus, Quadratus Lumborum and Obliques  all work together to maintain spine stability during gait. If there is weakness in the stance side musculature, you will observe a (+) Trendelenburg. 


(+)TRENDELENBURG STANCE:  Here, the right side is weak and to compensate for lack of pelvic control, the trunk sidebends to the right

A few exercises to help a client who presents this way are the following:
Farmer's Walk: By holding the kettlebell in the right hand, whenever you are in single leg stance on the left leg, you are challenging those hip and trunk muscles.  Your trunk is fighting the right sidebending force that holding the kettlebell in the right hand is introducing to your body


 Your body wants to take the easy route like in 'a' by sidebending to support the weight.  You must incorporate the proper trunk and hip musculature in order to maintain proper posture ('b')
 

The Bottoms Up Carry is more difficult due to the weight distribution of the kettlebell.  Here, you are incorporating grip strength, shoulder stability, as well as trunk and hip stabilizers

The Double Kettlebell Racked Walk adds more weight to be supported by each individual hip when in single leg stance and the compression on your trunk makes it a challenge to fully inhale easily.


Sunday, September 22, 2013

Plumb Line and Posture

Plumb Line and Posture
 
 
Upon meeting a new client or patient, one easy way to initiate your sessions is to assess their posture for any abnormalities.  A quick and easy way to do this is to set up a Plumb Line in your clinic.   


Have your client stand behind the plumb line in the appropriate position and observe.  Watch for a forward head posture, rounded shoulders, etc.  This will give you a great starting point regarding which muscles need stretching and which need strengthening.  Check out our Posture and Body Mechanics DVD for over 80 minutes of posture and body mechanics information and corrective strengthening/stretching exercises.  

Saturday, September 14, 2013

Sitting and Lower Back Pain

Sitting and Lower Back Pain


Many people complain of lower back pain, especially upon sitting.  If they have computer based occupations, this is a major problem for them.  Sitting posture is very important to educate your patients/clients on in order to reduce the stresses on the spinal tissues.  Sitting in a slouch position decreases muscle activity, stresses the annulus portion of the lumbar discs, and may lead to "disc creep" and disc herniation. 
 
SLUMPED
Sitting upright activates the hip flexors and lumbar extensors which in turn create compressive loads on the spine. 
UPRIGHT
 
You can teach your clients/patients how to find a "pelvic neutral" posture, but many feel that by maintaining any one position for an extended period of time will place a stress on the lumbar tissues. 
PELVIC NEUTRAL
 
It is recommended that your position changes frequently in order to shift the stress from one tissue to another, avoiding any type of overload.


Saturday, June 22, 2013

Scapula Stability

Scapula Stability

If your client's high plank or push up looks like this... 
 
...You will need to focus your sessions on posture and scapula stability. 
 
You may also notice your client's resting posture to look like this....


This "scapula winging" may be due to weak lower traps, serratus anterior, middle traps, or rhomboids (scapula stabilizers).
 
The proper plank position should be like this...
 
 
Train scapula stabilizers, incorporate tactile cues to manually assist your client in contracting the appropriate muscles, and you will improve this technique.

Thursday, February 23, 2012

Avoid Tunnel Vision

Many times, I will see a client who complains of knee pain.  During my initial assessment, I will check the knee strength and range of motion.  I will perform special tests to detect deficits with the ACL, PCL, Collateral Ligaments, Menisci, etc.  I will compare the "good" knee to the "bad" one with the prior tests and measures.  That would be considered a "FAIR" assessment.  But to provide a "GOOD" assessment, I must perform a 'peripheral joint scan' checking at least one joint above and one joint below the "problem" area to truly pinpoint the problem.  The knee pain could be caused by some biomechanical problem at the ankle such as over pronation due to tight gastrocnemius, tight soleus or restricted subtalar joint.  It could also be caused by weak hip musculature, particularly the posterior gluteus medius.  You may not pick up on these other areas as being potential causes until 2 or 3 sessions have gone by.  But the point is, do not have tunnel vision.  If your client attends 2 weeks of sessions, and there has been no change in the symptoms, that is your cue to look elsewhere as a possible cause.  Check one joint above and one joint below the knee.  You can usually detect signs of deficiency in these other joints while simply observing your client's posture, gait and stepping activities.  So always pay close attention to your client's movements, especially as they transition from one exercise or position to the next.  You will be surprised at what you see, as it may be the cause of their main complaint.

Wednesday, February 1, 2012

Osteoporosis & Posture

Osteoporosis, or loss of bone density, may lead to "brittle bones" and fractures, particularly in the spine, hips, and pelvis.  When the vertebrae are affected, 'wedging' of the anterior portion of the spinal bones may occur, which leads to a flexed or kyphotic posture.  With a rounded trunk, you will also see protracted shoulders, and a forward head posture, with excessive capital (head) extension.  Just by observing someone, you will have multiple treatment ideas. 

First and most importantly is to correct their posture by stretching the short, tight muscles and strengthening the stretched out weaker muscles.  Lets start at the head and neck.  With a forward head posture, you will have weak capital (head) flexors, and tight capital extensors.  To counteract this, teach your client chin tucks.  This will stretch the tight suboccipitals while strengthening the capital/head flexors.  It will also realign your ear with your acromion on both sides. 
Now for the shoulders and Scapulae.  We need to stretch our pectorals which have been tightened due to the constant protraction of the shoulders.  The posterior muscles have been stretched out and are weak due to this protracted posture, so you will need to work the retractors such as the rhomboids, rear delts and middle traps..."Bring those shoulders back!"

Most likely there will be a flat lower back, with loss of the lordotic curve.  Pelvic tilts are helpful to reintroduce flexibility and motion to this region.  you will also want to incorporate core stability training to your client, progressing from static to dynamic postures.  Focus on glute training with bridges and glute sets, as the glutes assist in lower back stabilization. 

Integrating the above techniques into each of your client's sessions will help them to correct their current posture, prevent any future injuries and impove their overall results, as it enhances efficiency of all movement.  Once you have corrected posture, then you can move into body mechanics and training movement patterns. 

Sunday, January 22, 2012

Simple Technique To Help Improve Posture

Almost all of my patients who come to me with neck pain and headaches require some sort of postural education and retraining.  Many of them work on a computer 8 hours a day for their job.  They feel relief from their symptoms following a therapy session.  However, after working for a day or two, the symptoms return.  When I am discussing this with them, I am always observing their posture.  Most of them revert back to the "slumped over" position in their chair.  Training your posture is not a '3 sets of 15 reps' type of training.  Yes, seated rows do work the scapular retractors which are very important for maintaining correct posture.  Unfortunately, many times you will notice someone performing the rows with great posture, and when they finish their set and stand up to walk over to the next exercise, they have that forward head posture with protracted shoulders again ("slumped").  Postural muscles need to have great endurance.  They must 'hold you' in proper alignment all day long to prevent injuries.  Basically, maintaining proper posture is an isometric exercise.  When retraining posture, you are creating new habits.  Initially, you will feel the medial scapula muscles burning and aching as you focus on holding proper posture.  Because of this, you will go back to your comfort position (protracted scapula and slumping).  You need to be constantly reminded to correct your posture.  One easy way to do this, especially for those of you who work long hours on the computer, is to tape a post-it to the monitor screen.  Write the word "POSTURE" on the post-it.  Everytime you look at the monitor, you will be reminded to correct yourself.  90% of the time when you first start this, you will catch yourself slumping.  Do this long enough and the new habit will take over.  Your proper, upright posture will become your new comfort zone, while the slumped posture will become uncomfortable.  Give it a try!