"KNOWLEDGE-BASED FITNESS"
Showing posts with label body mechanics. Show all posts

Wednesday, November 12, 2014

The Wall Squat

The Wall Squat
 
 Does the exercise above look familiar to you?  It may, especially if you have had Physical Therapy or Personal Training before.  In this exercise, a therapy ball is placed between the wall and your lower back.  You lean back against the ball, compressing it into the wall as you lower yourself into a squat, and return to upright.  This may be a leg strengthener, but how functional is it?  The squat is one of the most prevalent activities of your day.  Getting up and down from the edge of your bed in the morning, moving from the sitting to standing position from your chair at work, lowering yourself to pick something up from the floor are all examples of squatting activities.  In these activities, you must rely on your ankle, knee, hip and trunk stability to safely and efficiently lower your body and raise your body.  If you lean back too far, you will fall back, and if you shift forward onto your toes too much, you will fall forward.  There is no "safety mechanism" such as the therapy ball rolling on the wall to maintain your trunk's vertical orientation as you raise and lower your body. 

I prefer to customize my patient's exercises to be as efficient and focused as possible.  If I want them to strengthen their legs and I choose the squat as one of the exercises, they must first squat properly.  To do this, I have them train with a "real-life" version of the squat.  Instead of the Therapy Ball-Wall Squat, I will use the Box Squat or the Face The Wall Squat.


Above is the Box Squat.  Here, a bench, chair or plyo-box is placed behind you.  You hinge at your hips and push your butt back towards the box as you lower yourself down into the seated position.  Initially, I will have patients lower to the seated position, rest and then return to standing.  However, as they become stronger, I progress this exercise by having them lower themselves until they just about touch the box, and then return to stance.  Taking away the rest portion of the activity makes it more challenging due to the increased control and stability that is needed.  In the box squat, you must hip hinge and maintain proper knee alignment.
 
Do not allow the knees to cross anterior to your toes and do not allow the knees to "cave in" towards each other.
 
The Facing Wall Squat is another great activity that teaches proper squat technique while relying on your own body's feedback mechanism for stability rather than an external support.
Here, you stand close to the wall, facing it and lower yourself into a squat.  Your goal is to avoid hitting your knees or your head on the wall.  You will feel your weight shift back onto your heels and must stabilize to avoid falling backward.  Because of your position, the wall will give you the proper feedback to prevent your knees from shifting anterior to your toes.
 
The Therapy Ball Wall Squat reminds me of the Smith Machine.


The Smith Machine is another type of external support mechanism that in my opinion, reduces the use of your joint stabilizers to perform a movement such as the Bench Press, Shoulder Press or the Squat.
Here, the Smith Machine controls the bar, preventing it from shifting forward or back.  All you have to do is raise and lower it.  Less stabilization is required than if you had to control a free weight.


The Smith Machine Squat is similar to the Therapy Ball Wall Squat, as it prevents you from shifting forward or back as you raise and lower your body.  Less ankle, knee, hip, and trunk stability is required than if you were to perform a free standing squat (Box Squat or Face Wall Squat) that does not provide an external support system.

In my opinion, if a person can not do a proper body weight squat, then I would not have them perform a Smith Machine Squat using resistance/weight.  It is more important to perfect the squat movement prior to adding resistance to it.  I choose to use help my patients learn to properly squat for their everyday needs, rather than provide a bunch of external support so that they can increase the amount of weight that they squat.  If they can not squat their bodyweight properly, you should not be adding resistance to the movement.  This will only lead to bad habits, worse technique and injury.

Monday, November 18, 2013

Protect Your Back Even With Light Lifts

Protect Your Back Even With Light Lifts
 
 
Over ten years ago, due to heavy lifting with incorrect technique, I was unlucky enough to develop a herniated disc in my lower back.  This was the worst pain I ever experienced.  Thanks to Physical Therapy school, I was able to manage it conservatively.  However, every now and then it would "go out on me," causing severe pain with even the slightest movement.  One day, after being pain free for a few months, I told a family member I would help them move.  We had to lift and carry a 55-inch rear projection TV (the bulky kind, not the nice flat screens we have today).  I did my part without a problem.  Upon finishing up that day, I bent over to pick up a pencil from the living room floor, and fell to my knees in agony.  After everything I lifted and carried that day, a simple number 2 pencil drops me to my knees?  While on the floor, I had plenty of time to think about what had  just happened.  Why did my back tolerate heavy lifting all day long, but when I lifted something as light as a pencil, my back went out on me?  I realized that with every heavy lift, I did not just carelessly walk up to the item and lift it.  Instead, I prepared my back by co-contracting the spinal stabilizers prior to each lift and carry.  That's when I realized that it doesn't matter how heavy the object you are lifting is.  If you bend over to pick up an item, it is wise to perform the lift with proper body mechanics and pre-stress and stabilize your spine.  This will minimize your chances of injuring or re-injuring your spine. 

Thursday, November 14, 2013

"Your Hips Are Like Headlights On A Car"

"Your Hips Are Like Headlights On A Car"


When teaching a client about proper body mechanics and lifting techniques, a good visual cue is to tell them that their hips are like  headlights on a car. 


To safely drive at night, you must point the car's headlights in the direction that you want to go.  Functionally, to safely lift or reach, you must point your hip bones in the direction of the activity.  This spares the spine by minimizing lumbar rotation/twisting while bending/lifting.
 
Here, the hips are pointed to the right, while his bending/lifting activity is to his left
 
As she turns to the right, she pivots on her feet and moves as a 'whole,' squaring-off her hips in the direction of her action

Take home message: 
Always "square-off" your hips in the direction of your action.  Do not twist and lift from the left or right with your hips pointing in a different direction.
 
 For more on Posture & Body Mechanics, go to: Posture & Body Mechanics DVD for over 80 minutes of education videos


Wednesday, October 30, 2013

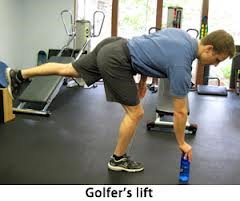
Golfer's Lift

Golfer's Lift
 
The golfer's lift is a helpful technique that you can use to lift lighter objects from the floor while sparing your spine. 
 
 
You can see there is a slight bend on the support leg knee, the lower back remains flat (not flexed), as a hip hinge technique is utilized rather than flexion of the spine.  There is also minimal rotation of the spine.  More helpful techniques are explained in the S.O.D. Posture & Body Mechanics DVD - Posture & Body Mechanics DVD

Monday, October 21, 2013

Is My Patient Exagerating Their Pain Level?

Is My Patient Exagerating Their Pain Level?
 
 
Many times, when working with clients who have been experiencing lower back pain for a long time (months or even years), the slightest touch or smallest movement will send their pain level through the roof.  Initially, as therapists we may think this to be an exaggerated response, a patient with a low pain threshold, or a patient with other motives.  But can the patient's experienced pain level really be this intense upon light touch or gentle movement?  It is believed that when tissue damage in a body region exists, the nociceptors (nerve cell that responds to painful stimuli) are increasingly stimulated, which amplifies the sensitivity to that stimulus.  You do not get used to pain caused by tissue damage, but become more sensitive to it.  This may cause a doctor to prescribe higher intensity pain medications or refer their patient to the pain clinic.  However, if we take a step back and treat the source of the tissue damage, which many times may be poor body mechanics or posture, we may be able to spare the tissue damage.  Once the pain level decreases we can begin to incorporate more aggressive rehabilitation exercises.  For information on posture and body mechanics, go to Posture & Body Mechanics DVD           

Sunday, September 22, 2013

Plumb Line and Posture

Plumb Line and Posture
 
 
Upon meeting a new client or patient, one easy way to initiate your sessions is to assess their posture for any abnormalities.  A quick and easy way to do this is to set up a Plumb Line in your clinic.   


Have your client stand behind the plumb line in the appropriate position and observe.  Watch for a forward head posture, rounded shoulders, etc.  This will give you a great starting point regarding which muscles need stretching and which need strengthening.  Check out our Posture and Body Mechanics DVD for over 80 minutes of posture and body mechanics information and corrective strengthening/stretching exercises.  

Saturday, June 22, 2013

Scapula Stability

Scapula Stability

If your client's high plank or push up looks like this... 
 
...You will need to focus your sessions on posture and scapula stability. 
 
You may also notice your client's resting posture to look like this....


This "scapula winging" may be due to weak lower traps, serratus anterior, middle traps, or rhomboids (scapula stabilizers).
 
The proper plank position should be like this...
 
 
Train scapula stabilizers, incorporate tactile cues to manually assist your client in contracting the appropriate muscles, and you will improve this technique.