"KNOWLEDGE-BASED FITNESS"

Monday, December 30, 2013

Happy New Year

 
Happy New Year from KB Fitness!!!

Don't spend another year limited in what you can do because of pain!

Take the initiative to help yourself or a family member get rid of lower back, neck or knee pain!


  Order a Strength On Demand Physical Therapy Home Exercise DVD Today at
 
 
Make sure you stick to your New Year's Resolution of being pain free!!!


Thursday, December 26, 2013

This Tip Eliminated Most of My Back Pain

In previous posts, I mentioned how I had been diagnosed with a herniated disc at L4-5 ten years ago, and that I am still aware that this is my weakest link.  I can feel the ache first thing in the morning, and must avoid any type of flexion activities for the first hour that I am out of bed.  I focus my  training sessions on core recruitment and stabilization while training full body movement patterns.  To my knowledge I was maintaining a stable trunk and was protecting my lower back.  However, the day after my training session, I would feel an increase in lower back soreness and felt that I had to be extra cautious with certain activities to prevent an increase in pain.

The majority of my training deals with multi joint movement patterns rather than isolating muscles.  I make sure to do squats, lunges, and deadlifts, and ensure that I incorporate a proper hip hinge rather than spinal flexion when lowering myself.  But there was one technique that I had not focused on while performing these movement patterns until recently.  And since doing so, my lower back pain has dramatically improved.  I have spoken about "gluteal amnesia" in the past.  One of the causes of this "amnesia" is that upon performing a squat, we use our hamstrings to extend our hips and our lumbar extensors to extend our spines while transitioning from the squat position to tall standing.  Using the spinal extensors to do this compresses the spine, causing more back pain.  This is most likely why I would wake up the following day in more back pain.  Incorporating the gluteals to extend the hips while returning to a standing position from a squat will help reverse this "gluteal amnesia," and save the back.  So I decided to try this a few days ago.  To do this takes concentration but is not too difficult.  All you do is "spread the floor" with your feet.  So when performing squats, as I descended and ascended, I was gripping the floor with my toes as I was pushing my feet isometrically outward, as if I was attempting to spread the floor.  This technique engages my glutes which extends the hips, bringing me into the upright position while taking the strain off of my spinal extensors (and reducing spinal compression).  I decided to incorporate this throughout my day, not just during training sessions.  I initiated getting out of a chair by "spreading the floor."  Squatting down to pick up my daughter, I did the same thing.  This morning I woke up with almost no lower back soreness. 

Try this technique and you will be amazed at how your back responds.  I was taught that my "lower back is like a bank account.  There is only so much money in it.  So use it only when you need to."  To do this, we must use proper and efficient movement patterns to eliminate unecessary stress on the spine.

Tuesday, December 24, 2013

Merry Christmas

Merry Christmas From KB Fitness!! 
 
 
Have a safe, happy and healthy holiday!!!

Saturday, December 21, 2013

Lower Back Pain and Radiating Symptoms

If you have been suffering with Lower Back Pain and radiating symptoms into your legs, you may want to know why this is happening and what you can do for relief. 

This video may help: Lower Back Pain Radiating Symptom Management

Thursday, December 19, 2013

Incorporating The Bridge

Incorporating The Bridge

 
The bridge is a common exercise prescribed to clients suffering from lower back pain.  Many of these  patients commonly present with crossed-pelvic syndrome (weak glutes and abs, tight hamstrings and hip flexors).  They have overworked hamstrings and underworked gluteals.  Upon performing the bridge, most will initiate the extension movement by firing their hamstrings, instead of their glutes.  Our goal is to teach them how to engage their gluteals first.  This will carryover into functional activities such as squatting.  Start by teaching a "Glute Set."  To do this, you have your client lie on their back and clench their butt.  The cue "pinch a dime" works well.  Then perform this same technique with your client lying on his/her back with their knees bent and feet flat on the floor.  "Pinch a dime" again.  Repeat this without any actual lifting of the pelvis until it is performed without hamstring contraction.  Palpate their hamstrings to ensure this.  Then, have them perform this technique and lift the hips off the floor.  If the hamstring are still firing early, having your client attempt the bridge with their toes touching a wall may help.  In this position, upon attempting the lift, gently ask your client to push their toes into the wall as if trying to extend the knees.  Contracting the quadriceps here, will inhibit the hamstrings from firing, and the glutes will do the work.  Have your client repeat this until it becomes habit.  Then check out the quality of their squat and see if it has improved.    

Monday, December 16, 2013

Rehab Devices That Make Life Easier: Bed Rail

Rehab Devices That Make Life Easier: Bed Rails
 
Occasionally, I will see patients who have been injured by falling out of bed.  Either they roll out of bed in the middle of the night, or upon attempting to transfer out of bed in the morning, they lose their balance and fall to the floor.  Sometimes this is due to the low height of the mattress, which makes it difficult to stand. 
 
Here are a few of the common bed rails.  There are different styles.  Some of them are retractable so that at night they run the length of the bed to prevent rolling out.  In the morning, you or a caregiver can retract it so that you can easily transfer out of bed.
 
The wooden panel is placed under the mattress so it stays in place


Saturday, December 14, 2013

Rehab Devices That Make Life Easier

Rehab Devices That Make Life Easier:
Walkers


Last entry discussed the two common types of canes, standard and quad.  If someone needs more assistance when walking, a walker should be considered.  There are many types of walkers to choose from.

The Standard Walker provides a stable base of support as it has 4 legs.  To prescribe appropriately, the user must have strong arms to support their body weight when pressing down on the handles during gait.  This walker is used many times by patients with weight-bearing precautions.  For example, if someone is not supposed to fully weight bear on 1 leg, they will need to use their arm strength and opposite leg strength with this walker in order to walk.  Because there is a weight bearing precaution, the walker of choice should not have wheels so that the walker will be less likely to roll forward uncontrollably.

The rolling walker provides faster and smoother mobility for people who do not have any weight bearing precautions of their legs and are more steady when walking and changing direction.

The three wheel walker is for people who need the assist of a walker, but are able to walk and negotiate obstacles confidently and safely.  This walker allows quicker direction changes.  Brakes are present for safety so that the walker does not "get away" from the user.


The 4 wheel walker is also used for the more highly functioning person who is unable to walk without the support of a walker, but wants to be able to walk with some quickness and be able to make  safe direction changes.  This walker is good for those who present with good balance, but have trouble walking long distances, as it offers a seat as well as brakes for safety.


The Hemi Walker is used by patients who have difficulty using the arm and leg on one side of their body, particularly stroke patients.  It can also be beneficial for people who need assistance with their balance but are unable to hold a walker with 2 hands due to an injury to 1 arm.  The wide base provides balance and stability and this walker can be maneuvered using only 1 arm.  Although it is maneuvered using one arm, it provides more support than the quad cane of the previous post. 


Thursday, December 12, 2013

Rehab Devices That Make Life Easier

Rehab Devices That Make Life Easier:
Canes

During Physical Therapy assessments, patients and their family members ask me for advice on which type of device they should use to walk safely.  In regards to canes, the most common are the straight cane and the quad cane.
STRAIGHT CANE

QUAD CANE
The main differences between these two types of canes are that the Straight Cane is used mainly for people with balance deficits, while the Quad Cane assists with balance deficits and lower extremity weakness and instability.  The straight cane should only be prescribed to a patient who has slight balance deficit and needs just a little extra support (wider base of support) when walking.  The straight cane is not a weight bearing device, so if your patient or family member seems to be pressing heavily down on the cane when walking in order to safely navigate their environment, the straight cane is not the appropriate device.  

The Quad Cane is a weight bearing device.  Many people recovering from stroke present with one-sided weakness and benefit from this type of cane in order to prevent buckling of their knee.  The only con is that all four legs of the quad cane must be placed on the floor/ground at the same time in order to be safe.  You should not walk and place the back two legs on the ground, followed by the front two legs of the Quad Cane.  It is sometimes more difficult to coordinate this action, and many times patients will trip over the Quad Cane.  

Take home message: A straight cane is only for people with slight balance issues while a Quad Cane assists with balance and weight bearing (supports the weak leg).  

Sunday, December 8, 2013

Rehab Devices That Make Life Easier

Rehab Devices That Make Life Easier
Lift Chairs & Seats
 
 
Many of my patients, mostly the elderly, have a very difficult time transferring from a seated to a standing position.  This is usually due to weakness of the leg muscles and/or arm muscles (you need your arms to push up from the chair).  There are some common devices on the market that help with this activity.  However, I do find that if people have a choice between 'working' to get out of a chair versus having the chair do the work for them, they choose the easier way.  Unfortunately, if you don't use it, you lose it.  The less you rely on your legs to help with the transfer, the weaker they become.  I always advise my patients to only use a lift seat/chair if they can not get out of a chair any other way.  If it takes a little work to do the transfer on their own, as long as it is still safe, they should do it without mechanical assistance.    
Cheaper of the two options, the seat lift can move from chair to chair and is purchased based on body weight


The chair lift is expensive but sometimes Medicare will cover a portion of it.  This will actually raise you up until you are almost standing


Friday, December 6, 2013

Rehab Devices That Make Life Easier

Rehab Devices That Make Life Easier
 

We tend to take for granted the ability to perform life's daily activities.  As a Physical Therapist, much of my treatment time is spent educating patients and their families on what they can do to make their lives less stressful, particularly when performing activities such as bathing, walking, changing position, and toileting.  Today's device is the Grab Bar.
   
These can be purchased at your local hardware store and can be installed in your shower to assist you with safely entering and exiting the bathtub or shower.  Many people rely on their bathroom towel rack.  However, many times leaning on this with your body weight  may pull it out of the wall, leading to an injury due to falling to the floor.  Suction cup grab bars are also sold.  However, I have heard both good and bad about them.  Many times they have to be re-applied every few weeks due to loss of suction.  It is because of this that I would not always trust the suction grab bars to support someone who has a very difficult time getting in and out of the shower and places a great deal of their body weight on them. 
 
Grab bars can also be used to assist getting in and out of your garage...

Or getting on and off of the toilet...

 
If you have a family member who presents with generalized weakness, is recovering from a surgery or is medically compromised, Grab Bars may make their life easier and will decrease their risk of future injuries.


Monday, December 2, 2013

Body Awareness

Body Awareness
 
Most people who are suffering from low back, knee, neck or other common conditions can greatly reduce their symptoms by simply correcting their posture, body mechanics, lifting techniques, etc..  However, this is not so simple.  Many people do not have the body awareness needed to perform correction techniques merely upon verbal cues by their trainer or therapist.  When I am faced with this client, I will allow them to rely on a mirror for feedback as well as providing them with manual cues.  Nowadays, everyone has a cell phone with camera capabilities.  I have taken pictures during a session and either emailed 'before' and 'after' photos to my clients for further education or I print out the photos to use during their sessions for visual feedback.  After educating my clients using these tools (mirror, photos, manual cues), I assess the carryover by removing those tools.  Once they are able to correctly perform the task at hand, I remove the external cues so that they further develop body awareness.  My goal is to ensure independence with body awareness.  After all, your client will not always have a camera, a trainer/therapist or a mirror available when performing daily activities.     

Saturday, November 30, 2013

Have Your Client Keep A Diary

Have Your Client Keep A Diary
 
Many times, clients you are training for their lower back pain seem to take one step forward and two steps back, or may make very slow progress combined with many setbacks.  Upon asking them "what happened," they say that they "have no idea."  You should not stop with that, though.  Most of the time, clients don't realize that even the slightest change in activity level or any additional activity performed may be the cause of their setback.  You should not be satisfied with their answer.  You need to probe further.  Have them walk you through their day, asking them throughout if what they are describing is their normal routine or not.  In this situation, I usually recommend my client keep a daily diary of activities and responses.  I tell them to write down what they do and how they feel afterwards.  If they feel lower back pain, they should stop and think about what activities preceded it.  However, explain to them that it is very important not to anticipate the pain.  They should not be so fearful that pain will result from an activity that they become 'bed-bound.'  You will want them to maintain as much of their regular routine as possible.  The diary will help you, as their educator, to alter the mechanics of the activities in order for them to be performed pain-free.  Sometimes, the slightest change in body mechanics, posture, body position or lifting technique will completely eliminate their pain.  The diary will give you a baseline focus for your sessions.  It will help you to not only make continuous assessments, but will also allow you to provide the appropriate corrective exercises.        

Tuesday, November 26, 2013

"No Pain, No Gain, Right???"

"No Pain, No Gain, Right???"


Wrong!!! Here's a quick tip when working with a back injury.  It is advised that therapeutic exercise for a lower back condition be pain-free.  If not, pain during the activity will create 'substitution' movement patterns as the spine attempts to protect itself from feeling the pain.  These 'substitution' movement patterns will cause more problems later on.  Your initial goal here is to relieve the inflamed tissues first, then work on regaining functional movement.   

Friday, November 22, 2013

Back Belt 2

More on Wearing Back Belts
 
 
The Valsalva Technique is a maneuver that people perform when they hold their breath and exert/squeeze/bear down.  Upon study, this technique creates an increase in Intra-Abdominal Pressure (IAP), which causes an increase in lumbar compression.  The prior theories stated that wearing a back belt would increase intra-abdominal pressure which would decrease compressive load.  However, this theory has been proven false.  As stated before, an increase in (IAP) pressure will increase lumbar compressive load.
 
The other theory was that the back belt will provide support to the lumbar extensor muscles.  The muscle activity of the extensors and the abdominals has been measured while a back belt was worn, and no significant change in muscle activity was shown. 
 
Also, when lifting and wearing a back belt, it was noted that blood pressure and heart rate rose significantly when compared to those lifting without a back belt.  With this, you would hope for a cardiovascular screening prior to any employer handing an employee a back belt to wear.  
 
Take home message:  The benefits of wearing the back belt are not as apparent as we once thought.  If a business requires its employees to wear these belts, their focus should be placed more on educating employees on overall fitness, body mechanics, lifting techniques and ergonomics so that they can rely on themselves for injury prevention rather than the back belt.  Interestingly, it was found that when wearing a back belt, the amount of weight a person was willing to lift rose 19%.  Does the back belt provide a false sense of security?  Either way, if you are used to wearing one, it is not advisable to eliminate it completely, but to wean yourself from it.     

Wednesday, November 20, 2013

Back Belts

Back Belts


How many of you have noticed the prevalence of employees in stores such as Walmart, Home Depot and Lowes wearing back belts?  As a therapist, many of my patients recovering from back injury are prescribed these also.  Do they really do what people say they do?  In 1994, the NIOSH (National Institute For Occupational Safety and Health) concluded that they do not prevent injuries or provide protection for workers who do not have a history of injury.  And although these belts may limit side-bending and rotation/twisting range of motion of the spine in standing, they do not limit these motions when the spine is flexed, which is the position of lifting when at work.  Therefore, upon lifting, these belts do not exactly do what people think.  


Monday, November 18, 2013

Protect Your Back Even With Light Lifts

Protect Your Back Even With Light Lifts
 
 
Over ten years ago, due to heavy lifting with incorrect technique, I was unlucky enough to develop a herniated disc in my lower back.  This was the worst pain I ever experienced.  Thanks to Physical Therapy school, I was able to manage it conservatively.  However, every now and then it would "go out on me," causing severe pain with even the slightest movement.  One day, after being pain free for a few months, I told a family member I would help them move.  We had to lift and carry a 55-inch rear projection TV (the bulky kind, not the nice flat screens we have today).  I did my part without a problem.  Upon finishing up that day, I bent over to pick up a pencil from the living room floor, and fell to my knees in agony.  After everything I lifted and carried that day, a simple number 2 pencil drops me to my knees?  While on the floor, I had plenty of time to think about what had  just happened.  Why did my back tolerate heavy lifting all day long, but when I lifted something as light as a pencil, my back went out on me?  I realized that with every heavy lift, I did not just carelessly walk up to the item and lift it.  Instead, I prepared my back by co-contracting the spinal stabilizers prior to each lift and carry.  That's when I realized that it doesn't matter how heavy the object you are lifting is.  If you bend over to pick up an item, it is wise to perform the lift with proper body mechanics and pre-stress and stabilize your spine.  This will minimize your chances of injuring or re-injuring your spine. 

Thursday, November 14, 2013

"Your Hips Are Like Headlights On A Car"

"Your Hips Are Like Headlights On A Car"


When teaching a client about proper body mechanics and lifting techniques, a good visual cue is to tell them that their hips are like  headlights on a car. 


To safely drive at night, you must point the car's headlights in the direction that you want to go.  Functionally, to safely lift or reach, you must point your hip bones in the direction of the activity.  This spares the spine by minimizing lumbar rotation/twisting while bending/lifting.
 
Here, the hips are pointed to the right, while his bending/lifting activity is to his left
 
As she turns to the right, she pivots on her feet and moves as a 'whole,' squaring-off her hips in the direction of her action

Take home message: 
Always "square-off" your hips in the direction of your action.  Do not twist and lift from the left or right with your hips pointing in a different direction.
 
 For more on Posture & Body Mechanics, go to: Posture & Body Mechanics DVD for over 80 minutes of education videos


Tuesday, November 12, 2013

Provide Justification For Everything You Do

Provide Justification For Everything You Do

 
Nowadays, everyone wants the most bang for their buck.  They want to train effectively and efficiently without wasting time.  As a trainer, you want to gain your client's trust and respect.  Most clients will come to you wanting to lose weight or "tone up."  And many of them will have underlying issues that training may bring to the surface, such as knee pain, back pain, etc...  It is your job to perform an initial assessment asking your client what their goals are, and if they have any pre-existing conditions that may slow their progress towards meeting those goals.  Once you gather a detailed history of your client, you can begin to "prescribe" goal oriented exercises.  You will combine what you have learned about their "weaknesses" with what you know about their goals and devise a training program based on this information.  Now you will not only be focused on their fitness, but also their wellness.  You will have justification for each exercise that you offer.  The reasoning will not just be "to break a sweat" or "burn out your biceps."  You will be able to explain that each exercise will prevent further injury, while developing their physique.  For example, if you have your client perform diagonal patterns with their upper extremities, you can explain that these patterns are functional in nature and will assist their daily reaching or overhead activities.  Using the plank exercise to introduce trunk control can be used for clients who have a history of lower back issues, as increasing trunk stability will assist in sparing the spine.  This should definitely be your goal as no trainer wants to 'hurt' their client.  Your clients will be impressed and pleased with this training style.  They will respect you for your knowledge and you will probably gain another referral source.   

Friday, November 8, 2013

Grip Training While Jumping Rope?

Grip Training While Jumping Rope?
 
 
Jumping rope provides a total body conditioning workout, with a focus on improving strength, agility, coordination, foot work and endurance.  You have the option of using a weighted jump rope or a speed rope, both of which provide the benefits previously listed.  A speed rope focuses on speed and quickness and is better for developing coordination and conditioning, while weighted jump ropes enhance strength of the upper body and burn more calories, which helps with weight loss. 

No matter which type of jump rope you use, adding NEUROGRIPS to the mix will not only provide the benefits listed above, but will also emphasize hand grip, wrist and forearm strength, and endurance.  Using NEUROGRIPS will increase the jump rope handle grip diameter by approximately 1 inch, making grasping of the rope handles more challenging.  This will raise your heart rate, burn more calories and provide you with yet another opportunity to incorporate grip training into your daily workout routine, without having to set additional time aside for the traditional grip training exercises.  

STANDARD JUMP ROPE


BAREHANDED GRIP - COMPLETE CLOSURE WITH FINGERTIPS TOUCHING PALM

NEUROGRIPS - NOTICE THE DISTANCE BETWEEN THE FINGERTIPS AND PALM - ABLE TO COMPRESS THE NEUROGRIP IN ORDER TO HOLD HANDLE - A REAL FOREARM BURNER!

 
Start training with NEUROGRIPS!


Wednesday, November 6, 2013

Worker's Compensation Light Duty

Worker's Compensation Light Duty
 
I have been treating a patient referred to me by Worker's Compensation.  This patient had a diagnosis of lower back pain.  His job consists of sitting at a desk for 8 hours straight with only two 15 minute breaks to get up to use the bathroom and an hour lunch.  Many propose that the time spent in sitting should be limited to 50 minutes before a short 'standing' break is taken.  
This patient states only the timed breaks described are allowed by the supervisor.  Therefore, I suggested that during this break, the employee perform the opposite movement/activity that they were performing while working.  Since sitting imposes flexion on the spine, which stresses the intervertebral disc's annulus fibrosis and may lead to disc posterior "creep," it is suggested that you stand up tall, raise the arms overhead, and push the hands toward the ceiling with a deep inhale.  This will fully extend the lower back, which reduces the annulus stresses.  I recommended that this patient stand as often as possible throughout the work day to go through the necessary work related paperwork.  Instead of sitting in a chair, bending forward to go through a bin of papers, place the bin on a higher surface and stand to do the same activity.  This will allow you to continue doing your job (so your supervisor can't complain), while at the same time 'sparing' your spine.  Your goal is to continually change positions so that the strain on your spine is not focused solely on one location, but shifts. It seems that patients who come to me with lower back pain are those who remain in the same position for extended periods of time.  If they were able to change positions frequently during their shift, their spine would be 'healthier.'  Unfortunately, once these patients are injured, they are usually placed on light duty, which consists of sitting in one position for even longer times during the work day, with minimal physical activity.   

Monday, November 4, 2013

Twisting Activities And Your Lower Back

Twisting Activities And Your Lower Back


Activities that require twisting your trunk while simultaneously increasing torque  (building axial torque) may lead to lower back trouble! 


Twisting motion disables the support fibers of the intervertebral disc's annulus fibrosis, which may lead to a bulging or herniated disc. 


Since it is believed that there are no muscles designed to produce only torso rotation (axial torque), then there is a limitation to muscles resisting rotational torque. Therefore, your goal is to generate rotational torque, while restricting torso twist.
Limits Torso Rotation


Friday, November 1, 2013

Vacuuming and Lower Back Pain

Vacuuming and Lower Back Pain
 
Many times, a patient with a diagnosis of lower back pain will tell me that the pain seems to increase when vacuuming. 
Most people tend to push/pull the vacuum with one arm.  The vacuum is held to one side, which places a twisting torque on the lower back.  This force causes man increase in lower back pain.
 
 In this picture, the man is holding the vacuum with two hands directly in front of his belly button.  The force is directed through the lower back with no rotational torque and is therefore less aggravating to the lower back.  Because of this, I usually advise my patients to try their best to keep the handle of the vacuum directly in front of their belly button region, at least until the acute symptoms subside.  As this new technique may not be familiar, it will protect the spine.  The more spine-sparing techniques that you perform during the day, the more you minimize the chances of symptom return. 

Wednesday, October 30, 2013

Golfer's Lift

Golfer's Lift
 
The golfer's lift is a helpful technique that you can use to lift lighter objects from the floor while sparing your spine. 
 
 
You can see there is a slight bend on the support leg knee, the lower back remains flat (not flexed), as a hip hinge technique is utilized rather than flexion of the spine.  There is also minimal rotation of the spine.  More helpful techniques are explained in the S.O.D. Posture & Body Mechanics DVD - Posture & Body Mechanics DVD

Monday, October 28, 2013

Postural Braces

Postural Braces
 
Many, if not all of my clients require postural education and training.  Posture seems to play a major role in most therapy conditions, especially shoulder, neck and lower back pain.  For the most part, I find myself constantly reminding clients to tuck their chin and retract their shoulders.  This "nagging" leads my clients to the question, "Can't I just buy a brace to keep me in proper posture?"  The answer is "yes, you can."  Here are two pictures of postural braces.
 
 
This brace appears to retract the shoulders/scapula and probably provides a sense of lower back support (I said a "sense" of support, not actual support").  Since many of my clients have the rounded anterior shoulder positioning, the chest muscles become tight, and the rear shoulder/scapula muscles become stretched out and weak.  The brace shown above pulls the shoulders back, stretching the chest and shortening the rear shoulder muscles.  But what happens when you remove the brace? Will the rear shoulder muscles now be strong enough to maintain the scapula retracted position against the anterior pull of the chest?  Probably not.  In my opinion, these braces are "quick fixes" that do not fix the source of the problem.  It is a superficial correction.  My goal is to have my clients rely on their own body to maintain proper body alignment.  Postural muscles work isometrically.  The posterior shoulder muscles must maintain the proper shoulder position throughout the day.  In short, you must stretch the pecs, and strengthen the shoulder/scapula retractors (muscle endurance).  I would only consider using a postural brace on a patient who has had chronic postural deformities, as the brace will assist in statically stretching muscles that have shortened over time.  I would still always include active strengthening to the affected postural muscles.  For my younger patients, I say: "Don't be lazy! Do the work! Stretch what needs to be stretched and strengthen what needs to be strengthened!"  Just maintaining proper posture as often as you can throughout your day is an exercise in itself.   
 
For the S.O.D. DVD on Posture & Body Mechanics, go to Posture & Body Mechanics DVD for over 80 minutes of educational videos

Friday, October 25, 2013

The NIOSH Risk Factors for Low Back Disorder

The NIOSH Risk Factors for Low Back Disorder
 
 
Are you at an elevated risk of lower back disorder? The National Institute for Occupational Safety and Health (NIOSH) released a list of risk factors.  They are as follows:
1. Seated or static work postures
2. Frequent trunk movement particularly rotation
3. Frequent lifting, pushing, pulling activities
4.  Seated whole body vibration (truck driver)
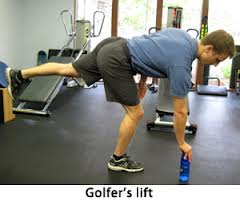
5. Repetitive lumbar full flexion
6. Time frame of performing the activity (how long after arising from bed)
 
Possible Solutions:
1.  Frequently change positions.  Get up and walk around a few minutes.  Stretch by reaching for the ceiling
2.  Avoid rotating the trunk if possible and pivot on your toes in order to turn your entire body in the direction of your activity
3.  Lift, pull, push with proper mechanics
4.  Avoid full lumbar flexion.  Use your legs in order to squat to get to a lower position 
5.  Do not begin these activities until you have been out of bed for at least 30 minutes-1 hour.
 
Your goal is to remove the stressors and enhance the activities that build support/stability


Wednesday, October 23, 2013

How Important Are The Trunk Muscles?

How Important Are The Trunk Muscles?
 
Here's a quick thought for you. Upon removing the spinal muscles from a cadaver, the lumbar spine began to buckle under a compressive load of just 20 pounds!  This tells us that stability created by our motor control system is extremely important in spinal protection during sustained postures, movements, and reacting to sudden movements.  These muscles must ensure stability, and all of the muscles are important, not just one particular group.  Poor motor control and faulty movement patterns create micro-trauma, which leads to injury, which worsens the movement patterns.  It becomes a vicious cycle that can be corrected by reeducating the faulty movement patterns.  Your goal is to work these movement patterns while maintaining a stable spine.     


Monday, October 21, 2013

Is My Patient Exagerating Their Pain Level?

Is My Patient Exagerating Their Pain Level?
 
 
Many times, when working with clients who have been experiencing lower back pain for a long time (months or even years), the slightest touch or smallest movement will send their pain level through the roof.  Initially, as therapists we may think this to be an exaggerated response, a patient with a low pain threshold, or a patient with other motives.  But can the patient's experienced pain level really be this intense upon light touch or gentle movement?  It is believed that when tissue damage in a body region exists, the nociceptors (nerve cell that responds to painful stimuli) are increasingly stimulated, which amplifies the sensitivity to that stimulus.  You do not get used to pain caused by tissue damage, but become more sensitive to it.  This may cause a doctor to prescribe higher intensity pain medications or refer their patient to the pain clinic.  However, if we take a step back and treat the source of the tissue damage, which many times may be poor body mechanics or posture, we may be able to spare the tissue damage.  Once the pain level decreases we can begin to incorporate more aggressive rehabilitation exercises.  For information on posture and body mechanics, go to Posture & Body Mechanics DVD           

Friday, October 18, 2013

Knee Arthroscopy

Knee Arthroscopy
 
 
If you or a friend/family member have recently undergone a Knee Arthroscopy Surgery due to damaged cartilage, meniscus or unexplained knee pain, specific Physical Therapy Home Exercises will be beneficial in your complete recovery.  You may be advised to attend a Physical Therapy clinic initially and will probably go 2-3 times a week (if your insurance, schedule, and wallet allows). 
 
The S.O.D. Knee Arthroscopy DVD consists of the same Physical Therapy exercises that will be prescribed to you when attending the clinic, and will therefore help you to maximize your knee strength and mobility even when your time at the clinic has ended. 
 
To see what a knee arthroscopy surgery entails, click here: Knee Scope Video

Wednesday, October 16, 2013

Sit-Ups and Training

Sit-Ups and Training
 
It is somewhat common knowledge that sit-ups may not be the best exercise for anyone to perform, especially someone suffering from lower back pain.  Many people feel that this is due to the activation of the psoas or hip flexor muscle during the sit-up, which results in compression of the spine.  As a result, people have turned to performing sit-ups with bent knees, feeling that by placing the psoas muscle in a shortened position, that it will not contract as intensely, thereby decreasing the amount of spinal compression.  Unfortunately, research shows that just the opposite is true; the shortened psoas must contract at a higher level due to its new shorter length.  This places even higher compression force on the spine.  Many researchers agree that when training for health purposes, sit-ups should be avoided all together.  There are better ways to train the abdominals while sparing the spine. 

Monday, October 14, 2013

Resting Between Sets

Resting Between Sets
 
If you have read the previous posts, you have noticed that I tend to avoid or at least minimize flexion of the trunk (particularly if you are not performing the hip hinge technique).  I advise this especially upon any type of resistance training.  In the gym, I notice many members training with proper form.  However, upon completion of a tough set, I see them in a seated slumped posture.
 
With the tissues and ligaments "warmed up," this type of flexion between sets may lead to further spine injury due to 'disc creep' and decreased vertebral shear control by the now 'silent' lumbar extensor muscles.  Don't bother working so hard during your set, if you are going to place yourself at further risk of injury during your rest.  Instead, take a walk to the water fountain, perform pull-up bar body decompression hangs, or lie on your stomach and prop up into a cobra stretch.  Perform extension, not flexion. 


Friday, October 11, 2013

Common Morning Stretches May Be Detrimental to Your Lower Back

Common Morning Stretches May Be Detrimental to Your Lower Back
 
Below are two very common stretches that many of my lower back patients tell me that they perform regularly in the mornings.
Stretch 1
 
Stretch 2
 
 These stretches may feel good.  However, you may be causing more harm than good.  Throughout the day, your spine undergoes compression and shear forces.  Upon fully flexing the spine (Image 1), you create a "flexion-relaxation phenomenon."  With this, the lumbar spine extensor muscles "relax" and no longer protect the back from shearing forces.  Stretch 2 feels good because it applies a stretch to the gluteal muscles.  However, the further you pull your knees to your chest, the more your spine flexes, the less the extensors protect your spine.  I would advise not to do these stretches first thing in the morning, never to do Stretch 1, and to perform Stretch 2 only up to the point that you feel the stretch in the gluteals.
 

Wednesday, October 9, 2013

ACL Repair

ACL Repair
 

The ACL stands for the Anterior Cruciate Ligament in the knee.  The ACL limits anterior translation of the tibia on the femur. 

This is a very common injury, particularly for athletes.  It may occur upon a direct blow to the knee region from the front, which is common in football.  Sometimes you will hear a "pop" upon ligament tear, and the knee joint swells quickly, making it painful to walk.  A feeling of knee instability may also occur following this injury.  If surgical repair is necessary, you will be facing months of Physical Therapy.  This will be time consuming and may be financially stressful.  To speed up your recovery, you will want to be compliant and persistent with your home exercise program.  To help you with this, www.strengthondemand.com offers a DVD Home Exercise Program that will guide you from Week 1 through Week 12 following your ACL Repair.  This DVD includes the most common ACL Repair Therapeutic Exercises for each time frame during your recovery.  This will speed up your recovery, saving you time and money.  
 
Below is a link to an ACL Repair Surgery video, as well as the link to the S.O.D. ACL Repair Rehabilitation DVD.  Check it out.


Monday, October 7, 2013

Single Leg Stance Muscle Activation

Single Leg Stance Muscle Activation
 
Upon standing on one leg, in order to maintain upright proper posture, you must maintain a level pelvis by firing the Gluteus Medius and Minimus as well as the Quadratus Lumborum and Obliques.  The Gluteus Medius, Gluteus Minimus, Quadratus Lumborum and Obliques  all work together to maintain spine stability during gait. If there is weakness in the stance side musculature, you will observe a (+) Trendelenburg. 


(+)TRENDELENBURG STANCE:  Here, the right side is weak and to compensate for lack of pelvic control, the trunk sidebends to the right

A few exercises to help a client who presents this way are the following:
Farmer's Walk: By holding the kettlebell in the right hand, whenever you are in single leg stance on the left leg, you are challenging those hip and trunk muscles.  Your trunk is fighting the right sidebending force that holding the kettlebell in the right hand is introducing to your body


 Your body wants to take the easy route like in 'a' by sidebending to support the weight.  You must incorporate the proper trunk and hip musculature in order to maintain proper posture ('b')
 

The Bottoms Up Carry is more difficult due to the weight distribution of the kettlebell.  Here, you are incorporating grip strength, shoulder stability, as well as trunk and hip stabilizers

The Double Kettlebell Racked Walk adds more weight to be supported by each individual hip when in single leg stance and the compression on your trunk makes it a challenge to fully inhale easily.