"KNOWLEDGE-BASED FITNESS"

Sunday, June 7, 2015

When Verbal Cues Are Not Enough

When Verbal Cues Are Not Enough

Many times, when educating patients/clients on performing specific exercises correctly, our verbal cues just don't seem to do the trick.  We verbalize how we want the exercise to be performed, yet sometimes our patient/client just can't get it.  Session after session, we find ourselves making the same corrections.  This can be problematic, especially if we expect our clients to be performing the same exercises at home, when we are not present to assist them. Simple techniques can be used to prevent recurring technique errors.  
One example of an exercise that is repeatedly performed incorrectly is Resisted Shoulder External Rotation.  To be performed correctly, simple commands that are used are "Keep your bent elbow tucked into your rib-cage.  Then turn your arm outward by rotating at the shoulder joint so that your hand moves away from the midline of your body." Performed correctly, Shoulder External Rotation in the neutral position should look like image 1 and 2. 
Image 1

Image 2
Unfortunately, most clients/patients perform the exercise as shown in Image 3 and 4
Image 3
Image 4
In Image 4, you can see that instead of keeping the elbow and upper arm tucked closely into the rib-cage, the arm raises in a diagonal direction.  There are times when you may want a client to perform this diagonal or PNF pattern with resistance, and there are times when you may want your client to perform Resisted Shoulder External Rotation in the shoulder abducted position.  However, if you want the exercise to be performed in the neutral shoulder abduction position (upper arm tucked into the rib cage), then you must correct any errors to the technique.  If verbal or manual cues only correct the exercise temporarily, try the following...
Image 5

Image 6
Roll up a towel and place it between the elbow and rib-cage of the 'working' arm.  Tell your client that they must perform Shoulder External Rotation without dropping the towel.  This external cue works like a charm.  And if the client performs this exercise as part of their home exercise program, you can rest assured that they will perform it correctly once you educate them to use a towel roll.
For more Shoulder Rehabilitation Exercises, click here

Another exercise that is commonly performed incorrectly is the    2-Leg Bridge.  Performed correctly, the Bridge exercise focuses on hip extensors, and is beneficial in improving gait, transferring out of a chair, scooting in bed and rehabilitating patients suffering from lower back pain.   Image 1 and 2 show correct form.
Image 1

Image 2
 At times, it may be difficult for your client to maintain proper lower extremity positioning during this exercise, particularly if they are recovering from a stroke, in which one side of their body is weaker than the other.  Image 3 shows an example of a patient I worked with in the past who could not keep her right leg in the proper position throughout the Bridge.  Her right knee kept falling out to the side due to weak hip muscles.
Image 3

No matter how many times I cued her to keep her knees close together, she would only correct it temporarily.  Eventually the right knee would drop to the side again.  I used a pillow to correct this problem and I never had to cue her again.  She was also able to perform the Bridge as part of her Home Exercise Program without making the same mistake.  All she had to do was remember to place a pillow between her knees, and no further cues were needed.  In Image 4 and 5, you can see that the patient's focus is not only lifting her hips off the bed, but to do it while squeezing the pillow.

Image 4

Image 5
FYI: With patients who are unable to  maintain the initial Bridge position with their knees bent and feet flat on the bed/floor due to extreme weakness or lack of flexibility, you can still train the hip extensors by performing a Straight Leg Bridge.   

Place 2 or 3 pillows under your client's lower legs.  Ask them to clench their butt and raise their hips off the bed by pressing their lower legs into the pillows.  Avoid hyperextension of the lower back in the top position.  See Image 6 and 7
Image 6

Image 7
For more Hip Rehabilitation Exercises, click here

Sunday, May 17, 2015

Make Sure To Do This When You Plank

Don't Just Hold The Plank...Crush IT!!

When training in your gym, you most likely have walked by another member holding the Low Plank for anywhere from 30 seconds to even minutes in some cases.  Initially, this is a challenging exercise.  However, with practice, you "learn" how to hold the position for extended times.  The plank is a great exercise for shoulder, scapula and trunk stability.  I have found that upon simply "holding" the plank position, with protracted scapulae and a flat (not arched) lower back, I can withstand it for a long duration before fatigue sets in.  When I incorporate other muscles, however, my tolerance goes way down.  In my opinion, if I can hold the Plank for 60 seconds, it's time to make it harder.  Kind of like being able to do 60 straight reps of biceps curls.  If you can do that, then it's time to raise the weight (depending on what your goal is, that is).      

Next time you try the plank, take these steps before you focus on hold time.  
Step 1: Get into Plank position.  
Step 2: Protract your shoulders/scapulae, tighten your thighs and clench your butt
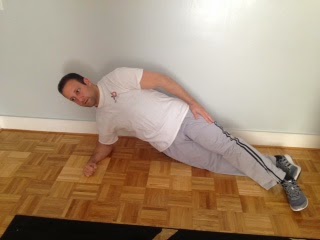
Step 3: While maintaining a strict Plank position, try to extend your shoulders so that your elbows move toward your feet.  Because your forearms are on the floor, they will not actually be able to slide toward your feet.  But this isometric contraction will engage your trunk muscles.  A visual of what you are trying to do can be seen below....


Use the same technique for the High Plank and Side Plank

High Plank with shoulders flexed 90deg
 A visual of what you are trying to do can be seen below....
Clench your butt and tighten your thighs

With your palms on the floor, attempt to extend your shoulders so that your hands move toward your feet.  Again, because your palms are on the floor, no actual movement of your arms will occur.  You will remain in the High Plank position with shoulders flexed 90 degrees and elbows fully extended.  However, your trunk muscles will engage upon the isometric shoulder extension.  Make sure that you do not arch your lower back.  No movement should occur anywhere.  Just an isometric contraction of your shoulders, trunk, glutes and thighs

Side Plank
 A visual of what you are trying to do can be seen below....
In the Side Plank position, tighten your thighs and clench your butt
Attempt to slide the arm that your are propped on down toward your feet.  And again, the arm does not move as it is fixed to the floor due to your body weight.  Do not allow any motion anywhere.  You will feel your trunk engage laterally. 

With these minor adjustments, can you still hold the planks for 60, 70, or 80 seconds?  Let us know how you did!

Sunday, May 10, 2015

Another Lunge Modification

Another Lunge Modification

When performing the Body Weight Lunge, you must maintain a vertical spine.  Do not allow your back to flex forward toward the lead leg or laterally to either side.  

The trailing knee moves directly toward the ground, without allowing the knee cap to touch the ground.  This will prevent patella-femoral compression.  The lead knee remains in line with the center of the lead foot, not allowing the arch of the foot to drop (avoid being flat-footed).  Basically, avoid any "down and in" motion of the lead knee.  To return to upright, push through the front heel (not the toes!), until you are upright with both knees extended and gluteals contracted (clench your butt).


A common modification of the lunge is an Elevated Lunge, where the trailing foot is elevated either on a plyo-box, chair or suspension trainer.  This forces the lead leg to work harder, provides a more aggressive stretch to the trailing thigh, and more aggressively challenges ankle stability of the front foot.  You must maintain the same technique as mentioned above in regards to posture and leg position.


In yet another modification, instead of elevating the trailing leg on a chair, box or suspension trainer, place your trailing foot flat against the wall behind you with approximately 90 degrees of knee flexion.  
Notice the trailing leg has approximately 90-degrees knee flexion and is flat on the wall.  You must push into the wall through the heel, not the toes and your lead knee should not cross in front of the toes


As you move into a vertical lunge, maintain the same form as with the Standard Lunge.  Do not allow your trunk to shift forward or laterally, and do not allow the lead knee to move "down and in."  At the same time, maintain a "push" of the trailing foot into the wall through the heel.  Try to keep the amount of push into the wall constant throughout both phases of the repetition (concentric/eccentric). This creates an isometric hip extension contraction of the rear leg throughout the entire repetition, while the front leg works to lower and raise your body.  As a result, you are working the gluteals on both sides more aggressively than in the previous two lunge techniques.   Try it out and let me know what you think.  Start with just body weight.  Then try it with a kettlebell racked on either side.

Sunday, May 3, 2015

Train Smarter!

Train Smarter!

When trying to balance your training with work and family obligations, you may find yourself short on time.  But you figure, "something is better than nothing." So you need to train smart.  Knowing what you are training will help you to train efficiently.  So you should choose exercises wisely.  One example is the kettlebell lunge.
The 1 Arm Racked Kettlebell Lunge:

This exercise is obviously a leg exercise.  But that is not all!  You must hold the kettlebell in the racked position using one arm.  This places an asymmetric downward force on the kettlebell side of your trunk/body.  To prevent laterally "giving in" to the added weight, the opposite side of your trunk must contract to stabilize in order to maintain a neutral spine.  You must maintain grip on the kettlebell handle and not allow the shoulder blade on the side of the kettlebell to drop or protract due to the added weight either.  In all, you are training the legs, the trunk, grip and scapula stability.


Double Kettlebell Lunge:

Although you are lunging with added weight compared to the single kettlebell lunge, you do not have the asymmetric weight applied to the trunk.  So lateral stability will not be as much of an issue.  However, you must still maintain grip of each handle, prevent both scapula from protracting, and the added weight to your chest/trunk will actually make it slightly more difficult to deeply inhale during the set


To increase the challenge further, perform the Bottoms Up Kettlebell Lunge.  Here, you are working even harder to maintain control of the kettlebell handle using hand, wrist and forearm strength.  This also challenges scapula and shoulder stability on the kettlebell side, and the asymmetric weight will again require lateral trunk stability.  

So, if you want to get more bang for your buck, making slight adjustments to a traditional exercise will train more than you initially thought.  You end up training multiple regions of the body using one technique.  This is efficient training!

Sunday, April 26, 2015

Get A Jump Start On Your Recovery

Get A Jump Start On Your Recovery


The above is something that has become very common regarding health care coverage.  Many times, your medical insurance will not cover enough Physical Therapy treatment, or not enough local providers will accept your insurance.  Either way, you are left wondering if you will be able to return to your prior athletic or functional level.  That is where www.strengthondemand.com comes in.  

Exercises for common therapy diagnoses are offered in the Protocol section of our website, including protocols for the ankle, knee, hip, shoulder, elbow, neck and lower back.  There is also a protocol for people who are Homebound & Deconditioned, recently released from the hospital, and those who are having difficulty with balance, transfers, bed mobility and fall recovery.  All protocols are in video format based on time frames following your injury or surgery.  You are not only educated on what exercises to do, but you are also advised on when to perform the exercises in order to maximize your rehabilitation.  

KB Fitness Home Exercise Physical Therapy Protocols can be used alongside your present therapy treatment.  If you do not feel that you are receiving an adequate amount of Physical Therapy from your current provider due to insurance issues, or if you can not afford to attend therapy at all, KB Fitness Protocols can help! You are provided with printouts of each protocol's exercises so that you can consult with your doctor or therapist for further guidance. A Consultation Service is also offered to ensure that your questions are answered, further guiding your recovery.  

Let KB Fitness be your Knowledge Base!!

Sunday, April 19, 2015

Incorporate This Trunk Rotation Stability Exercise

Incorporate This Trunk Rotation Stability Exercise
 
When lifting anything, we hear "lift with your legs, not your back!"  When using the spine  to perform resistive activities, many times a dangerous amount of pressure is placed on the ligaments and intervertebral discs.  Over time, this may lead to injuries such as bulging or herniated discs.  Spinal flexion places strain on the discs.  Spinal rotation also places strain on the discs.  But when you combine the movements (flexion with rotation), the discs are most vulnerable.  If these motions are dangerous, is it wise to perform them with resistance added?  I prefer to focus on Spinal Stabilization rather than Resistive Trunk Strengthening Exercises.   
 

Some common trunk exercises you may have seen are the Side Bend QL, Resistance Tubing Trunk Rotation, and the Medicine Ball Trunk Twist.


These exercises are aimed at strengthening the spine throughout the range of motion.  But at what cost? 
 
Try to incorporate the following exercise to your routine for Spinal Rotation Stability. 
Rack a Kettlebell in 1 hand.  This alone places an asymmetric force on your spine.  Your goal is to maintain a neutral spine and not allow the trunk to side-bend toward the added weight.  This is already working the QL on the opposite side of the Kettlebell

 
Press the weight overhead.  This continues to challenge your trunk's stability with the  direction of the force applied from a different position/angle

 
Here's where the rotation comes in.  Instead of actively twisting your spine with the applied resistance (as shown in the Med Ball Twist and Resistance Band Trunk Rotation pics above), rack the weight, rotate your trunk about 30 degrees to the right while maintaining forward facing hips (Your knees and pelvic bones continue to point straight ahead), and then perform the shoulder press.  Attempt a few reps in this position   


Then, rotate your trunk a little further from the 30 degrees to about 60 degrees trunk rotation.  Again, keep your hips and knees pointing forward.  Press the weight overhead.


Repeat to the other side at 30degrees, then 60degrees. 

 
The point to this exercise is to engage your trunk stabilizers at a spinal position, and maintaining this stability throughout the lift.  You are challenging multiple spinal positions by varying the amount of trunk rotation.  You are NOT using the spine to rotate a load. You are using the trunk musculature to stabilize the spine when in a rotated position.  This, in my opinion is a safer way to train your trunk.

 
Add even more of a challenge to your grip, trunk and shoulder stabilizers by performing the same activity with the Kettlebell in the Bottoms Up Position...Then try it with Neurogrips!!(www.neurogrips.com)


Thursday, April 9, 2015

Many Benefits To This Knee Exercise

Many Benefits To This Knee Exercise
 
Following an injury or surgery to your knee, regaining strength and mobility is a very important goal to establish.  In addition, your standing balance and hip stability may also be impaired during this time.  These goals are all very important if you have stairs at home, because you will need to safely navigate them so that you do not fall and become a "frequent flyer" at your local hospital. 

Most patients who have stairs in their home and are recovering from a knee or hip injury have been told "Up with the good, down with the bad."  This means that initially you must rely on the uninjured or "good" leg to control your body weight when ascending and descending stairs.  The "good" leg goes up first in order to lift your body to the next step.  On the way down, your "bad" leg goes to the lower step first as you must control the descent of your body using the stronger leg.  This is the safest way to navigate the stairs.  However, your ultimate goal is to regain symmetry in leg strength.  So a few weeks into recovery, as long as there are no weight bearing precautions on the injured leg, I will have my patient stand at the bottom of their staircase to practice placing the weaker leg on the first step.  Once they gain the appropriate range of motion in the hip or knee to allow placement of the foot on the step without compensation, I will progress them to lifting their body to the next step using the "weaker" leg.  Remaining at the lowest section of the staircase ensures client safety, as being at the bottom of the staircase, if the weaker leg does buckle, they will not fall down a flight of steps.  As confidence and strength improves, I will have my client perform multiple repetitions of this activity and eventually navigate the staircase alternating legs.
 
Now, going back to the "up with the good, down with the bad" technique.  Besides safety, there are many other benefits to using this technique.  In order to lift and place the "good" leg onto the first step, you must shift your weight onto the weaker leg.  This weight shift onto the weaker leg helps improve stance time on that leg during gait, which will minimize limping.  It also helps to improve the "weaker" side's hip, knee and ankle stability , as well as single leg balance, and client confidence level.  Many times, my clients will shift their weight onto the weaker leg and very quickly 'throw' the stronger leg up to the step, either because the injured leg is not strong enough to hold the body up, or their confidence in single leg stance on the weaker side is poor.  I provide verbal cues and sometimes manual cues to assist proper technique while letting them know that I will not allow them to fall.  They must perform this step-up slowly and with control.  The slower they lift the "good" leg to the next step, the longer they must stand on the weaker side, thereby improving hip strength, stability and single leg balance.  

As their confidence, balance and strength improve, I ask them to lift the "good" leg up two steps.  I do not require them to lift their body to the second step, but use this technique to challenge their stability and single leg balance on the weaker leg even more.  They must stand on the affected side for a longer time in order to place the "good" leg on the second step with control and coordination.  

If knee mobility is an issue, I will have them perform foot placement of the affected, weaker side on the first step with a progression to the second step, incorporating a lunge stretch in order to maximize knee flexion range of motion.  This technique will be easier  for them as they are standing on the stronger leg in order to place the weaker leg on the first or second step in order to perform the stretch.
 
So, you are not just performing stair training here.  You are also working on balance, stability, confidence, flexibility, and strength.  
 
Stair Training Tips:
1) Lifting the stronger leg first ensures safety and also forces you to balance on the weaker leg.  This improves standing tolerance on the affected side, single leg balance and hip/ankle/knee stability
2)Lifting the weaker leg first will help strengthen that leg as it must then lift your entire body to the next step.  Once the weaker leg is positioned on the next step, lunging into it will improve knee flexibility on that side.