"KNOWLEDGE-BASED FITNESS"
Showing posts with label core. Show all posts

Sunday, May 17, 2015

Make Sure To Do This When You Plank

Don't Just Hold The Plank...Crush IT!!

When training in your gym, you most likely have walked by another member holding the Low Plank for anywhere from 30 seconds to even minutes in some cases.  Initially, this is a challenging exercise.  However, with practice, you "learn" how to hold the position for extended times.  The plank is a great exercise for shoulder, scapula and trunk stability.  I have found that upon simply "holding" the plank position, with protracted scapulae and a flat (not arched) lower back, I can withstand it for a long duration before fatigue sets in.  When I incorporate other muscles, however, my tolerance goes way down.  In my opinion, if I can hold the Plank for 60 seconds, it's time to make it harder.  Kind of like being able to do 60 straight reps of biceps curls.  If you can do that, then it's time to raise the weight (depending on what your goal is, that is).      

Next time you try the plank, take these steps before you focus on hold time.  
Step 1: Get into Plank position.  
Step 2: Protract your shoulders/scapulae, tighten your thighs and clench your butt
Step 3: While maintaining a strict Plank position, try to extend your shoulders so that your elbows move toward your feet.  Because your forearms are on the floor, they will not actually be able to slide toward your feet.  But this isometric contraction will engage your trunk muscles.  A visual of what you are trying to do can be seen below....


Use the same technique for the High Plank and Side Plank

High Plank with shoulders flexed 90deg
 A visual of what you are trying to do can be seen below....
Clench your butt and tighten your thighs

With your palms on the floor, attempt to extend your shoulders so that your hands move toward your feet.  Again, because your palms are on the floor, no actual movement of your arms will occur.  You will remain in the High Plank position with shoulders flexed 90 degrees and elbows fully extended.  However, your trunk muscles will engage upon the isometric shoulder extension.  Make sure that you do not arch your lower back.  No movement should occur anywhere.  Just an isometric contraction of your shoulders, trunk, glutes and thighs

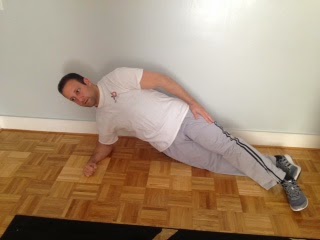
Side Plank
 A visual of what you are trying to do can be seen below....
In the Side Plank position, tighten your thighs and clench your butt
Attempt to slide the arm that your are propped on down toward your feet.  And again, the arm does not move as it is fixed to the floor due to your body weight.  Do not allow any motion anywhere.  You will feel your trunk engage laterally. 

With these minor adjustments, can you still hold the planks for 60, 70, or 80 seconds?  Let us know how you did!

Wednesday, January 21, 2015

High Plank Modification Adds Multiple Benefits

High Plank Modification Adds Multiple Benefits
 
 
The High Plank Exercise is a great exercise that focuses on shoulder and trunk static stabilization.  There is no motion...only a timed positional hold.  This can be easily modified using a Strength On Demand Resistance Band. 
 
The following progression will challenge:
-dynamic shoulder and scapula stability on the weight-bearing arm
-strength of the postural scapular muscles, including the rear deltoids and middle traps on the moving arm's side
-rotational stability of the trunk

High Plank
Start in a high plank position anchoring the resistance band with one hand, gripping the other end of the resistance band with the opposite hand.  The closer your hands grip on the resistance band, the more difficult this technique will be, so leave some slack in the band when you first attempt.  A little bit of resistance is all you need to feel this exercise!
 
High Plank
 
high plank
While one end of the resistance band is anchored to the floor with one hand, the 'moving arm' is lifted to the side into horizontal abduction.  Here, my right arm (the anchor) remains stable (shoulder/scapula stability) while my other arm is moving out to the side (working the rear delts and middle traps).  The motion of my arm is creating rotational force on my trunk, which I must resist.  My hips and torso remain "squared-off" with the floor.  This is rotational stabilization.  This is a great progression for clients in the mid to later stages of rehabilitation from shoulder and/or lower back injuries.

Get your resistance band HERE!!


Sunday, June 1, 2014

Common Physical Therapy Questions

Common Physical Therapy Questions
 
As a Physical Therapist, I have heard certain questions frequently over the years.  This past week, I have been treating numerous patients following a Total Hip or Total Knee Replacement Surgery.  Many of these patients have trouble lifting their operative leg into bed when transferring from the sitting to the supine position.  My previous post explains how using the S.O.D. Stretch Strap can assist the patient with maintaining independence while performing this technique.  However, most patients do not have a strap so soon following their return home from the hospital.  They accept the fact that they can't lift their leg and rely on a family member to lift it into bed for them.  Even weeks after surgery, they may rely on someone else's help for this.  When the family asks me if this is normal, I tell them that the weakness is normal.  However, it is not only muscle weakness that is the cause.  The patient must begin to redevelop the motor pattern to lift their leg into bed by practicing it over and over.  Many times, if I perform the leg raise while cueing the patient to assist, after a few times, the patient is amazed at how quickly the movement returns.  It is as if they must re-establish the brain-leg connection in order to perform the task again.  I advise family members to assist only after the patient has made an effort first.  This will help the patient recover quicker and will prevent the family member from injuring themselves in the process of helping.
 
I have also been working with many Worker's Compensation patients who have injured their backs.  Most of them tell me that they bent over to pick something up and felt it "go out" at that moment.  After weeks of successful therapy, including core stabilization activities, body mechanics and lifting education,  I usually get the same question:  "When can I go back to lifting like I used to, without having to think about it?" 
 
And I answer them with: "Never.  You should have never lifted like that to begin with.  That's why I have been teaching you body mechanics and lifting techniques.  It is your goal to establish new posture and body mechanics so that you don't have to think about it the next time you are required to bend to lift something."


So although most of us have rarely thought about how we are to lift something off the floor, if we are taught the correct way to do it, and practice it repetitively, our new habit will minimize the risk of lower back injury in the future.  Just because we have been lifting a certain way all of our lives, does'nt mean that we have been doing it correctly.  The older we get, the higher the chance that poor lifting techniques will catch up with us. 
 

Thursday, May 22, 2014

Rotational Stability of The Trunk

Rotational Stability of The Trunk
The Renegade Row
 
The previous blog posts discuss exercises that are beneficial for developing rotational stability of the trunk using body weight.  These should be performed correctly prior to performing stability exercises using weight/resistance. 
 
Assuming you are able to maintain stability with the prior exercises, you may attempt Renegade Rows, using Kettlebells or Dumbbells.
 
Start Position Renegade Rows - Notice the flat lower back

Here, I shift my body weight onto my right arm in order to row the kettlebell using my left arm.  My hips and shoulders remain "squared-off" with the ground - Next I lower the left arm, shift my body weight to my left arm and row using the right arm

Incorrect Form: My hips and shoulders are not "squared-off" with the ground

Incorrect From: My lower back is not flat, but jacknifes prior to the row

The above two incorrect techniques are very commonly seen with clients who do not have the rotational stability to perform this exercise.  They may have trunk weakness or may just need additional verbal and manual cues in order to improve the motor planning/coordination of the activity. 


Monday, May 19, 2014

Rotational Stability of The Trunk

Rotational Stability of The Trunk
 
The Super Plank is a great trunk stabilization technique.  It actually requires you to maintain a stable trunk while transitioning from a static position, 'dynamically' to another static position.  At the point of incorporating this activity into your program, you should have no problem maintaining static trunk positions.  The challenge here is dynamic stabilization.  You are moving from the Low Plank position to the High Plank position with minimal trunk rotation.   
 
Start Position: Low Plank

 I transfer my body weight onto my right arm in order to change the position of my left arm to the high plank position.  With this, a rotational load is placed on my trunk

Incorrect: This would need a correction, as you can see my left hip is no longer "squared-off" with the ground.  I gave in to the rotational force

Correct High Plank Position

Incorrect High Plank Position: I am in a jacknifed position rather than a high plank position

Transition from High Plank to Low Plank: Here, I transfer my bodyweight onto my right arm in order to reposition my left arm into a low plank position without losing the "squared-off" hip position with the ground

Incorrect transition of High Plank to Low Plank.  My right hip is higher than my left hip.  Both hips should be level and parallel to the ground

If you see your client performing the Super Plank technique with any of the "incorrect" behaviors mentioned above, attempt to correct them verbally or manually.  If they can not correct it, then this may be too advanced at this time.  Check out the previous posts for less aggressive stability techniques to master prior to returning to the Super Plank


Sunday, May 18, 2014

Rotational Stability of The Trunk

Rotational Stability of The Trunk
 
In the last post, I talked about maintaining stability of the trunk while performing the High Plank Shoulder/Elbow Tap, with various foot positions.  In this post, I will disucss maintaining trunk rotational stability while performing the High Plank Hip Extension technique, with modified hand positioning.


Start position - Notice the hand and foot position - The hips are "squared-off" with the ground

Slowly lift one leg while maintaining the hip "squared-off" position - If you place a  broomstick across the lower back horizontally from one hip to the other, the stick should be parallel to the ground - One side of the stick should not be higher than the other (This is a good feedback technique)
 
Progress the exercise by adjusting the base of support - Decreasing the base (hand position)increases the difficulty

Completion of the level two exercise

Incorrect Performance - It is subtle, but if you look at my right hip, it is slightly higher than my left - I lost the "squared-off" positioning of my hips - This would be more noticeable using the broomstick to assess - I lost the rotational stability slightly - Look for this compensation with clients when training rotational stability


Another common compensation for inability to stabilize the trunk is the jacknifed position seen here prior to hip extension.  This is no longer the High Plank Position


Thursday, May 15, 2014

Rotational Stability of the Trunk

Rotational Stability of the Trunk
 
When training your trunk (or core) for stability, resisting rotational forces is one complex and important aspect.  Many of the single arm activities that we do, such as the one arm kettlebell deadlift, apply a weight to one side of our body.  This asymmetrical load applies a force on our trunk, which causes it to rotate to one side (our body gives in to the weight).  To stabilize our trunk, we must fight this rotation, and remain "squared off." 
In this picture, the kettlebell in the right hand creates a trunk rotation to the left.  He must stabilize in order to keep his hips and shoulders squared off with a target in front of him
 
There are many beneficial trunk stabilization exercises.  Some are basic, while others are more complex.  Unfortunately, I have seen people in the gym performing most of them with poor technique.  Many people are in a hurry to progress themselves to the more complicated techniques before they really should.  This post will discuss some of the more popular basic trunk stability exercises, proper technique and common errors that I see each day.  It is your job as a trainer to assess your client's abilities in order to progress them properly and avoid injury. 
 
First is the Low Plank and the High Plank.  These are not focused on rotational stability but are more introductory.
Low Plank: Correct - Goal is high reps, holding each one for 5-7sec

High Plank: Correct
 
Low Plank - Incorrect:  This is not acceptable, as you can notice the hyperextension in my lower back and the protruding scapulae.  I am not maintaining stability

  Once you perfect the low and high plank, you may progress to the rotational stability exercise called the High Plank Elbow or Shoulder Tap. 
Wide Base Elbow Tap Start Position

Wide Base Elbow Tap Finish Position: Notice my hips remain "squared off" with the ground

Incorrect Wide Base Elbow Tap: I lost my rotational stability and begin turning my trunk

Progress the above rotational stabilization exercise by modifying the base of support:
Narrow Base Elbow Tap: Start Position and more aggressive due to modified base of support
 

Correct Narrow Base Elbow Tap

Incorrect Narrow Base Elbow Tap: Again notice my rising left hip - If your client is compensating like this even following your verbal and manual corrective cues, they are not ready for this yet

These are just a few of the progressions you can perform when training trunk stability.  Stay tuned for the next post which will discuss other beneficial techniques


Monday, April 28, 2014

Training the Obliques

Training the Obliques
 
Here's a training substitution that you can make if you are recovering from a back injury.  Everyone knows that in order to protect your back you must train the core.  So you do sit ups, back extensions, seat torso twists, etc... However, many of the gym exercises that we once thought were beneficial for our core and lower back, may actually cause more spinal problems.  For example, when training obliques, many people will be seen on the Resisted Torso Rotation Machine. 


Unfortunately, repeated twisting causes deterioration of the annulus portion of the spinal disc.  Adding resistance to the rotational movement of the spine can be even more detrimental.  
 
  
Substitute the Seated Torso Twist with the Side Plank to train the Obliques.  It will train the core, and spare the spine.  Hold each repetition for 5-7sec and alternate sides for 8-10 reps each
LEVEL ONE: After each 5-7sec rep, do not drop your hips straight down to the floor.  Instead, push your butt back by hinging at your hips.  This will avoid excessive lateral flexion of the spine and will minimize overall strain on the back
 
LEVEL TWO

 
Check out www.lowbackpainvideos.com for more Lower Back Rehab Exercises

Thursday, March 27, 2014

Drive Through Your Hips

Drive Through Your Hips
 
Throwing a ball, swinging a club or a tennis racket and even punching an opponent revolve around rotational force of the hips as well as forces produced through the ground, rather than solely upper extremity strength.  The order of recruitment of power, particularly with heavy hitters is as follows: the swing is led first by the hips, then the trunk, arms, hands and finally the bat.  The more rotational velocity you can produce with your hips, the greater the force transmitted to the ball.  To improve this hip velocity and ground force, you should practice the movement pattern as well as practice the actual task (specificity of training).  If we learn how to create more force through the ground, this increased force will transmit through our bodies and into our target.  Check out the hip position and trailing foot in these pictures:


If we practice a technique that focuses on hip rotational velocity and explosiveness, we will throw further/faster, hit harder, punch with more force, etc...Here are some simple exercises that will help "groove" the hip rotation motor pattern:  Notice the trailing leg, how the foot pivots, the hip extends, and the 'snap' of the hip rotation/extension.  This creates the force that transmits through the trunk, into the upper extremities, directed toward the goal.  If you do not pivot on your trailing foot, you risk injuring your knee.
 
 
Here, I use a Persian Mil to help train the pivot, hip rotation, and trunk stability, as I thrust the Mil forward. This works the above discussed movement pattern as well as grip strength and shoulder stability.  To challenge the grip even more, I perform this technique using Neurogrips


 Now, I perform the same activity using a longer lever which makes control and stability even more difficult.  This further develops rotational hip velocity, trunk control and coordination of my lower extremities.
 
 
 You can try this out with a wooden dowel to smooth out the movement pattern, and progress to a weighted bar.