"KNOWLEDGE-BASED FITNESS"

Sunday, May 17, 2015

Make Sure To Do This When You Plank

Don't Just Hold The Plank...Crush IT!!

When training in your gym, you most likely have walked by another member holding the Low Plank for anywhere from 30 seconds to even minutes in some cases.  Initially, this is a challenging exercise.  However, with practice, you "learn" how to hold the position for extended times.  The plank is a great exercise for shoulder, scapula and trunk stability.  I have found that upon simply "holding" the plank position, with protracted scapulae and a flat (not arched) lower back, I can withstand it for a long duration before fatigue sets in.  When I incorporate other muscles, however, my tolerance goes way down.  In my opinion, if I can hold the Plank for 60 seconds, it's time to make it harder.  Kind of like being able to do 60 straight reps of biceps curls.  If you can do that, then it's time to raise the weight (depending on what your goal is, that is).      

Next time you try the plank, take these steps before you focus on hold time.  
Step 1: Get into Plank position.  
Step 2: Protract your shoulders/scapulae, tighten your thighs and clench your butt
Step 3: While maintaining a strict Plank position, try to extend your shoulders so that your elbows move toward your feet.  Because your forearms are on the floor, they will not actually be able to slide toward your feet.  But this isometric contraction will engage your trunk muscles.  A visual of what you are trying to do can be seen below....


Use the same technique for the High Plank and Side Plank

High Plank with shoulders flexed 90deg
 A visual of what you are trying to do can be seen below....
Clench your butt and tighten your thighs

With your palms on the floor, attempt to extend your shoulders so that your hands move toward your feet.  Again, because your palms are on the floor, no actual movement of your arms will occur.  You will remain in the High Plank position with shoulders flexed 90 degrees and elbows fully extended.  However, your trunk muscles will engage upon the isometric shoulder extension.  Make sure that you do not arch your lower back.  No movement should occur anywhere.  Just an isometric contraction of your shoulders, trunk, glutes and thighs

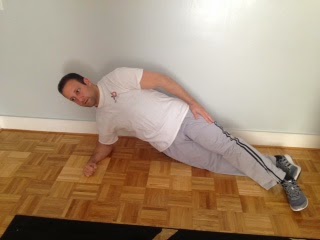
Side Plank
 A visual of what you are trying to do can be seen below....
In the Side Plank position, tighten your thighs and clench your butt
Attempt to slide the arm that your are propped on down toward your feet.  And again, the arm does not move as it is fixed to the floor due to your body weight.  Do not allow any motion anywhere.  You will feel your trunk engage laterally. 

With these minor adjustments, can you still hold the planks for 60, 70, or 80 seconds?  Let us know how you did!

Sunday, May 10, 2015

Another Lunge Modification

Another Lunge Modification

When performing the Body Weight Lunge, you must maintain a vertical spine.  Do not allow your back to flex forward toward the lead leg or laterally to either side.  

The trailing knee moves directly toward the ground, without allowing the knee cap to touch the ground.  This will prevent patella-femoral compression.  The lead knee remains in line with the center of the lead foot, not allowing the arch of the foot to drop (avoid being flat-footed).  Basically, avoid any "down and in" motion of the lead knee.  To return to upright, push through the front heel (not the toes!), until you are upright with both knees extended and gluteals contracted (clench your butt).


A common modification of the lunge is an Elevated Lunge, where the trailing foot is elevated either on a plyo-box, chair or suspension trainer.  This forces the lead leg to work harder, provides a more aggressive stretch to the trailing thigh, and more aggressively challenges ankle stability of the front foot.  You must maintain the same technique as mentioned above in regards to posture and leg position.


In yet another modification, instead of elevating the trailing leg on a chair, box or suspension trainer, place your trailing foot flat against the wall behind you with approximately 90 degrees of knee flexion.  
Notice the trailing leg has approximately 90-degrees knee flexion and is flat on the wall.  You must push into the wall through the heel, not the toes and your lead knee should not cross in front of the toes


As you move into a vertical lunge, maintain the same form as with the Standard Lunge.  Do not allow your trunk to shift forward or laterally, and do not allow the lead knee to move "down and in."  At the same time, maintain a "push" of the trailing foot into the wall through the heel.  Try to keep the amount of push into the wall constant throughout both phases of the repetition (concentric/eccentric). This creates an isometric hip extension contraction of the rear leg throughout the entire repetition, while the front leg works to lower and raise your body.  As a result, you are working the gluteals on both sides more aggressively than in the previous two lunge techniques.   Try it out and let me know what you think.  Start with just body weight.  Then try it with a kettlebell racked on either side.

Sunday, May 3, 2015

Train Smarter!

Train Smarter!

When trying to balance your training with work and family obligations, you may find yourself short on time.  But you figure, "something is better than nothing." So you need to train smart.  Knowing what you are training will help you to train efficiently.  So you should choose exercises wisely.  One example is the kettlebell lunge.
The 1 Arm Racked Kettlebell Lunge:

This exercise is obviously a leg exercise.  But that is not all!  You must hold the kettlebell in the racked position using one arm.  This places an asymmetric downward force on the kettlebell side of your trunk/body.  To prevent laterally "giving in" to the added weight, the opposite side of your trunk must contract to stabilize in order to maintain a neutral spine.  You must maintain grip on the kettlebell handle and not allow the shoulder blade on the side of the kettlebell to drop or protract due to the added weight either.  In all, you are training the legs, the trunk, grip and scapula stability.


Double Kettlebell Lunge:

Although you are lunging with added weight compared to the single kettlebell lunge, you do not have the asymmetric weight applied to the trunk.  So lateral stability will not be as much of an issue.  However, you must still maintain grip of each handle, prevent both scapula from protracting, and the added weight to your chest/trunk will actually make it slightly more difficult to deeply inhale during the set


To increase the challenge further, perform the Bottoms Up Kettlebell Lunge.  Here, you are working even harder to maintain control of the kettlebell handle using hand, wrist and forearm strength.  This also challenges scapula and shoulder stability on the kettlebell side, and the asymmetric weight will again require lateral trunk stability.  

So, if you want to get more bang for your buck, making slight adjustments to a traditional exercise will train more than you initially thought.  You end up training multiple regions of the body using one technique.  This is efficient training!