
 Posts


Things to Remember When Recovering From a Total Knee Or Total Hip Replacement
Total Hip Replacement
When undergoing a Total Hip Replacement, there are two common approaches, Anterior or Posterior.
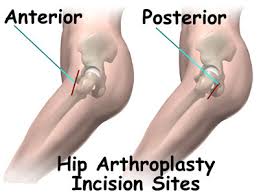
Briefly, with both approaches, you will be able to weight bear on the surgical leg after surgey as much as you can tolerate when walking (unless the surgeon specifies otherwise). You may be placed on blood thinning medication following surgery to prevent blood clots, and will have your blood checked by a Home Health Nurse or at a clinic throughout the weeks following surgery using PT/INR testing to see how quickly your blood clots. The quicker it clots, the higher the chance of blood clots. However, the longer it takes to clot, the more blood loss you may have upon simple cuts, such as when shaving (it is advised to use an electric razor during this time).
Briefly, with both approaches, you will be able to weight bear on the surgical leg after surgey as much as you can tolerate when walking (unless the surgeon specifies otherwise). You may be placed on blood thinning medication following surgery to prevent blood clots, and will have your blood checked by a Home Health Nurse or at a clinic throughout the weeks following surgery using PT/INR testing to see how quickly your blood clots. The quicker it clots, the higher the chance of blood clots. However, the longer it takes to clot, the more blood loss you may have upon simple cuts, such as when shaving (it is advised to use an electric razor during this time).
Your incision site will be bandaged and daily dressing changes are usually ordered. After 10-14 days, the bandage and staples will be removed and replaced by steristrips. Do not pull the steri-strips off. They will fall off on their own. As the edges begin to curl up, you may trim them.

Once the wound is closed and there is no drainage, you will be able to shower. In addition to the Home Health Nurse, you should take the responsibility of assessing for signs of infection, such as fever, redness, inflammation and/or pus discharge at the incision. If your temperature is above 101 degrees, contact your surgeon.
Use the incentive spirometer ten times per hour, at least twice a day.

Wear your TED Hose as directed by your doctor. You may be allowed to remove them overnight and for sixty minutes twice a day (ask your surgeon).
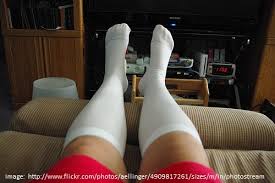
While lying in bed, keep your legs elevated by rolling up towels or pillows, and placing them under your ankles. This will protect your heels from the pressure of the mattress. Do Not place anything under your knees
Once the wound is closed and there is no drainage, you will be able to shower. In addition to the Home Health Nurse, you should take the responsibility of assessing for signs of infection, such as fever, redness, inflammation and/or pus discharge at the incision. If your temperature is above 101 degrees, contact your surgeon.
Use the incentive spirometer ten times per hour, at least twice a day.
Wear your TED Hose as directed by your doctor. You may be allowed to remove them overnight and for sixty minutes twice a day (ask your surgeon).
While lying in bed, keep your legs elevated by rolling up towels or pillows, and placing them under your ankles. This will protect your heels from the pressure of the mattress. Do Not place anything under your knees
For the Posterior Approach, restriction of movement and positioning include:
- No crossing your ankles
- Do not combine hip flexion, adduction and internal rotation


- If you sleep on your side, place a pillow between your knees

- No sidelying hip abduction exercise until 4 weeks post-op

- No resistive exercises for 4 weeks (no weights on the surgical leg)
- Walk, Walk, Walk!!!
For the Anterior Approach, restrictions include:
- No crossing ankles
- Initially, no Straight Leg Raises, no Hip Extension, no groin or hip flexor stretches, no Squats or Lunges. Ask your surgeon upon follow up when you can begin these exercises, then see Total Hip Replacement DVD.
- Walk, Walk, Walk!!!
In regards to walking following both Approaches, you may progress from a walker to a cane to no device if it does not cause an increase in pain and if you can fully weight bear on the affected leg without a limp.
Total Knee Replacement
Following most Total Knee Replacements, there are usually less movement precautions than the Total Hip Replacement. Your staples will be removed within 10-14 days, steri-strips will be applied, and you will be allowed to shower following staple removal as long as the incision is not open or draining. You may also be placed on blood thinners. You will receive an Incentive Spirometer, and will be required to wear TED Stockings. You will be able to Weight Bear on the affected leg as much as you can tolerate and may progress from a walker to a cane to no device as long as the quality of your gait pattern is not antalgic (no limp). The initial focus is on gaining full knee extension range of motion.


You must be able to fully straighten your leg as soon as possible. Flexion of the knee will be a challenge too. However, it will come in time. Extension is the priority. Remember, you may not place anything under your knee when sitting or lying. No pillows, no rolled towels, nothing under your knee!!! In fact, it is advised to place a pillow or towel roll under your ankle in order to assist gravity in fully straightening your knee.
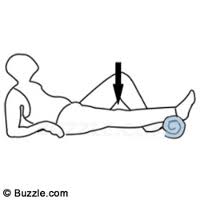
Following surgery, you may be sent home with a CPM unit which is a Continuous Passive Motion Unit. This will move your knee from a bent position to a straight position for you, and you can expect to use it three times a day for two hours each time.

You also will be given exercises to do (See Total Knee Replacement DVD), but should not perform Resistive Exercises for 4 weeks. Remember, most importantly, Walk, Walk, Walk!!
You must be able to fully straighten your leg as soon as possible. Flexion of the knee will be a challenge too. However, it will come in time. Extension is the priority. Remember, you may not place anything under your knee when sitting or lying. No pillows, no rolled towels, nothing under your knee!!! In fact, it is advised to place a pillow or towel roll under your ankle in order to assist gravity in fully straightening your knee.
Following surgery, you may be sent home with a CPM unit which is a Continuous Passive Motion Unit. This will move your knee from a bent position to a straight position for you, and you can expect to use it three times a day for two hours each time.
You also will be given exercises to do (See Total Knee Replacement DVD), but should not perform Resistive Exercises for 4 weeks. Remember, most importantly, Walk, Walk, Walk!!
If you are considering a Total Hip or Total Knee Replacement, there have been many advancements in the technology which claim to be less invasive, causing minimal muscle and tissue damage, thereby speeding up your recovery time. Unfortunately, with newer techniques, there is less information regarding long term results. There are pros and cons to the newer as well as the traditional surgical techniques. It is good for you to do your homework on what is available, before making a decision. Some doctors perform these newer techniques more frequently than other doctors, so take your time finding the right surgeon. Research how many replacements and what types of replacements they do each year. This will help guide you in your decision.
An example of a newer technique for a less invasive hip replacement can be seen HERE. And for a more customized, patient-specific knee replacement, click HERE. These are not the traditional replacement surgeries, and may offer faster recovery times.
An example of a newer technique for a less invasive hip replacement can be seen HERE. And for a more customized, patient-specific knee replacement, click HERE. These are not the traditional replacement surgeries, and may offer faster recovery times.


