

Hip Replacement: What You Need To Know Part 3
More Information About The Surgery
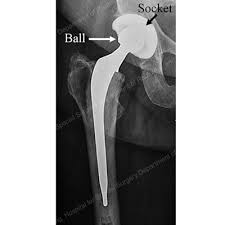
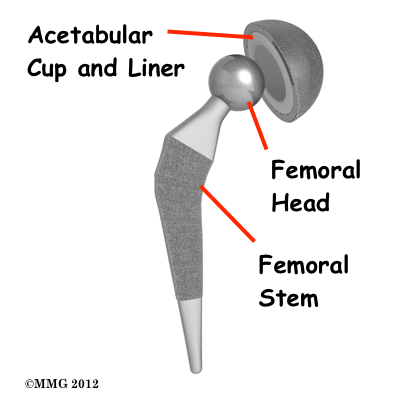
The Total Hip Replacement prosthesis is made up of a ball component and socket component. These may be made of metal or ceramic. Depending on your bone density, the components may be cemented into place or press-fit to allow the bone to grow into the components.
You will either be put to sleep using general anesthesia, or may be given a spinal/epidural or nerve block which allows you to remain awake, but numbs you from the waist down.
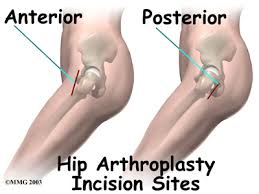
During the surgery, which lasts a few hours, the damaged cartilage is removed and replaced by the prosthetic components to allow proper function and alignment of your hip. Plan to stay in the hospital for a few days.
Initially, a foam wedge may be placed between your legs in order to maintain the hip precautions (prevent ankle crossing).

A Physical Therapist will evaluate your strength, balance and ability to transfer, walk and navigate stairs (if you have stairs at home) the day of the surgery or a day after, depending on the surgeon's orders. If it seems that you will not be safe to return home, inpatient rehab will be recommended.
Pneumonia is potential risk following surgery due to pain medication, bedrest and anesthesia. To help prevent pneumonia, a spirometer will be provided in order to minimize shallow breathing. This measures the amount of air you inhale and exhale. You must use this frequently throughout the day as an exercise.

You will either be put to sleep using general anesthesia, or may be given a spinal/epidural or nerve block which allows you to remain awake, but numbs you from the waist down.
During the surgery, which lasts a few hours, the damaged cartilage is removed and replaced by the prosthetic components to allow proper function and alignment of your hip. Plan to stay in the hospital for a few days.
Initially, a foam wedge may be placed between your legs in order to maintain the hip precautions (prevent ankle crossing).
A Physical Therapist will evaluate your strength, balance and ability to transfer, walk and navigate stairs (if you have stairs at home) the day of the surgery or a day after, depending on the surgeon's orders. If it seems that you will not be safe to return home, inpatient rehab will be recommended.
Pneumonia is potential risk following surgery due to pain medication, bedrest and anesthesia. To help prevent pneumonia, a spirometer will be provided in order to minimize shallow breathing. This measures the amount of air you inhale and exhale. You must use this frequently throughout the day as an exercise.
Your incision may be closed using stitches or staples which will be removed within two weeks. A water proof bandage may be applied by the surgeon, which will allow you to shower without having to change the bandage.


Exercise is critical in your recovery. Following inpatient rehab, you may want to consider home care Physical Therapy. On average, the return to light daily activities takes 3-6 weeks. Your Physical Therapist may provide you with a Home Exercise Program which you should perform daily. These exercises can be purchased in video format HERE. You can also find videos on bed mobility, transfers, stair navigation, fall recovery, and embolisms with the Tips for Knee Rehab: $16.95 DVD and Home Bound and Deconditioned DVD: $26.95
One common life threatening complication following surgery is the formation of blood clots in your leg veins.

TEDs support stockings and blood thinners are usually prescribed by your surgeon as a preventative measure.
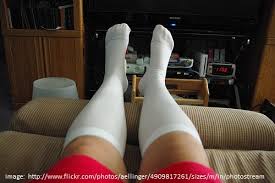
Ankle pumps and daily walking will also be beneficial. Warning signs of a blood clot are
1)pain in your calf unrelated to the surgery site
2)redness, warmth and/or swelling of your leg.
If you suddenly experience shortness of breath or chest pain, call 911 as this may mean that a clot has reached your lungs and you may be experiencing a pulmonary embolism.
TEDs support stockings and blood thinners are usually prescribed by your surgeon as a preventative measure.
Ankle pumps and daily walking will also be beneficial. Warning signs of a blood clot are
1)pain in your calf unrelated to the surgery site
2)redness, warmth and/or swelling of your leg.
If you suddenly experience shortness of breath or chest pain, call 911 as this may mean that a clot has reached your lungs and you may be experiencing a pulmonary embolism.
Following surgery, there is always a risk of infection. If you suffer from a fever, chills, redness or swelling at the incision site, drainage from the wound or severe pain in the hip, you will need to call your surgeon immediately and follow all directions received. Also keep in mind that you will no longer be able to have dental work without taking antibiotics prior.
If you plan on travelling after your surgery, consult with your surgeon to discuss how long you need to wait following the surgery. You may also want to request a card that will tell all travel security agents that you have a prosthetic hip, as you may activate metal detectors following the replacement.
For the Total Hip Replacement DVD, which explains common Physical Therapy exercises and appropriate time frames following the surgery, click HERE.
